Using setup steps to capture variables and parameterize HTTP requests allows you to test a wide range of use-cases for your web service. Here's how it works with Assertible.
Signup for a free account to start testing your API
When testing an API, there are often cases where you need to use data
from another HTTP request in your test. For example, to test a
/users/{{userid}} endpoint, you first need to call /users to get a
{{userid}}.
Assertible's setup steps give you the ability to
do this by capturing variables and substituting
them in your test before it is run. Let's walk through creating a test
for our /users/{{userid}} endpoint and using a setup step to
populate the {{userid}}.
Outline of our process
Create a new test for the
/users/{{userid}}endpoint.Add a setup step that populates the
{{userid}}variable.Use our variable to make assertions on the HTTP response.
When we're done, we'll have a test for a dynamic API endpoint with assertions using dynamic data:
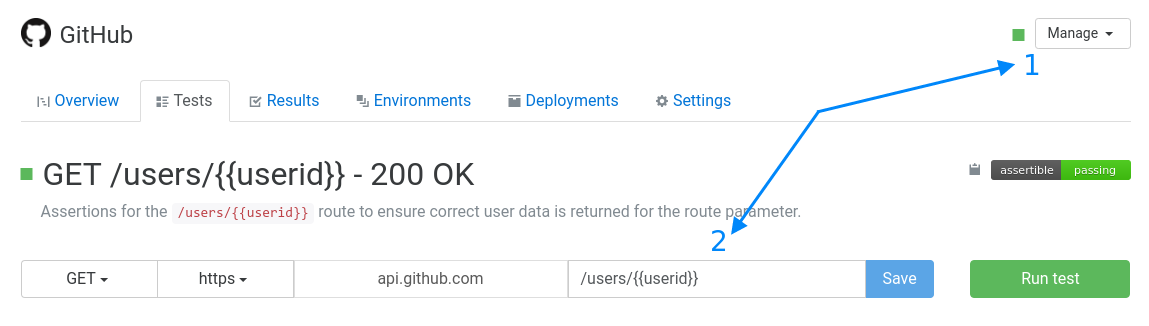
Create a new test for your web service
First let's create new API test. On your web service's overview page,
find the "Manage" dropdown and choose "Create test"
(docs). In the new test's request configuration, set
the endpoint as /users/{{userid}}:
The double-brace syntax around the {{userid}} in the endpoint is
a test variable. Before the test is run, the
variable will be populated with the data from our setup step.
If we run our test now, it will fail with a 404 because the
{{userid}} variable wasn't populated with any data. Let's move to
the next step and get our test using the correct user id.
Make a setup step and populate a variable
Now that we have a test for our API using a variable, we need to populate our test variable with some data. There are a couple ways to do this with Assertible:
For our /users/{{userid}} endpoint we'll use the first option. Our
setup step will make an HTTP request, before our test is run, to
call the API's /users endpoint and save an id from the response to
the {{userid}} variable.
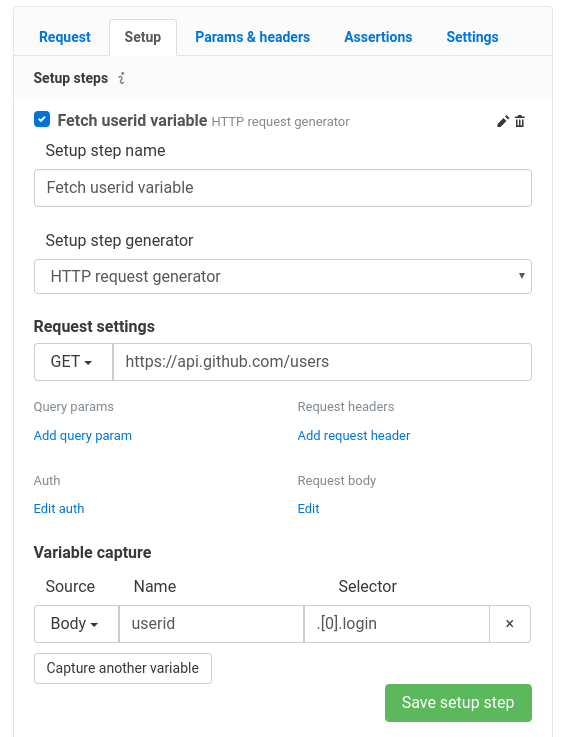
Create a setup step by visiting the "Setups" tab of your new test and choosing "Add setup step". Next, configure the setup step to make an API request and capture a variable from the response. Your settings should look like this:
- Name: Fetch userid variable
- Generator: Select the HTTP request generator
- Request settings: In this area, fill out the URL and other
settings to call the
/usersendpoint. - Variable capture: Add one variable capture where:
- Source: Select Body
- Name: Our variable name is userid
- Selector: In the
/usersJSON response, we want to select the first users ID:.[0].login
Learn more about creating setup steps here.
When you have everything filled out, save the setup step and enable it
for this test. Now the {{userid}} variable in our API endpoint will
be replaced with data from the setup step! If we run the test now,
our 200 OK status code assertion will succeed and the test will be
passing.
Add JSON response assertions using variables
Prop tip! Variables can be used in assertions as well as test settings like an endpoint. Learn more.
With a passing web service test, we can start creating better
assertions for the API response and make our test more robust. Using
the JSON path data assertion, we will test
that the /users/{{userid}} endpoint is returning the correct data
for the userid parameter.
On the "Assertions" tab of your test page click "Add assertion", and
for the type of assertion choose JSON path data. This assertion
allows us to use
the JSON path selector syntax to
assert that the .id field in the JSON API response is equal to our
{{userid}} variable used in the endpoint:
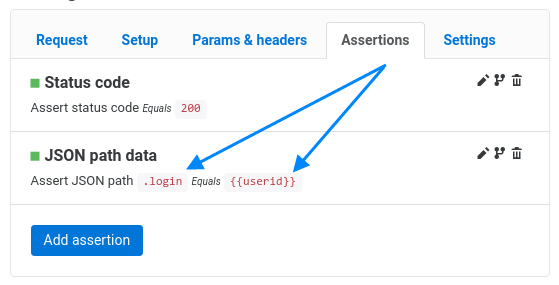
The Assertion Comparator will stay as Equals and the the
Assertion Target will be the {{userid}} variable. If you save the
assertion and run the test now, you'll see that our assertion target is
populated with the {{userid}} value.
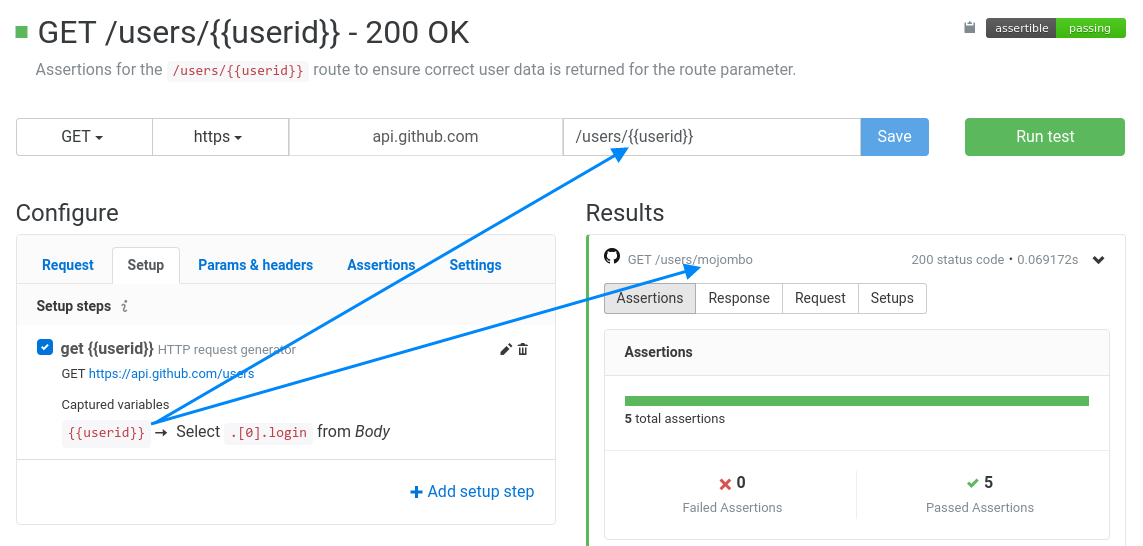
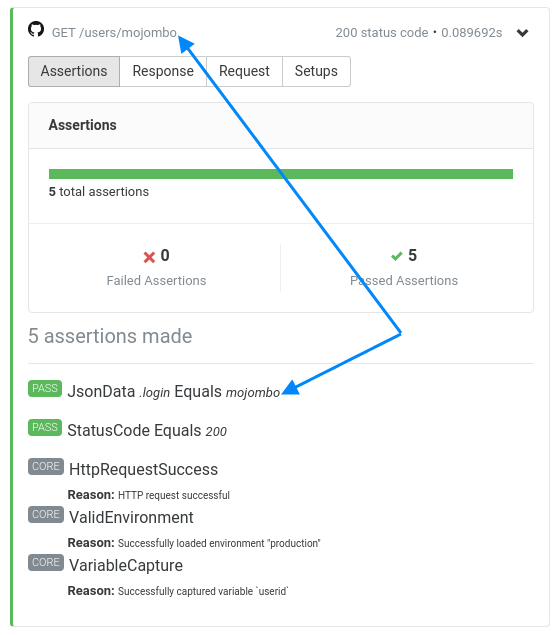
Every time our API test is run, we are asserting that the
/users/{{userid}} route returns the correct user data for the user
id that was provided. The end result will look like this:
Wrapping up
To sum up what's happening in our test:
- Before the test is run, a separate HTTP request is made to
populate the
{{userid}}variable. - Any usage of
{{userid}}in our test will be replaced with the captured data. - The test is run with the replaced variables in our endpoint.
- Assertions are made on the JSON API response.
There's a lot more you can with setup steps, test variables, and JSON path data assertions. Check out more examples in the docs and create your free Assertible account to get started today!
If you have any questions or feedback, send us a message or reach out on Twitter!
Assuredly yours,
Cody Reichert
Co-founder, Assertible
Categories
The easiest way to test and
monitor your web services
Reduce bugs in web applications by using Assertible to create an automated QA pipeline that helps you catch failures & ship code faster.
Recent posts
Tips for importing and testing your API spec with Assertible 05/26/2020
New feature: Encrypted variables 10/30/2019
New feature: Smarter notifications 5/17/2019