Tests are the cornerstone of Assertible and used to check and validate HTTP requests and responses. In a nutshell, a test is a single HTTP request which utilizes assertions and configuration data to prove an endpoint is working as expected.
Tests are designed to be small, reproducible, and deterministic so that there are no false-positives and error messages can be reported accurately.
Contents
- Create a new test
- Configuring a test
- Tests and assertions
- Setup and teardown steps
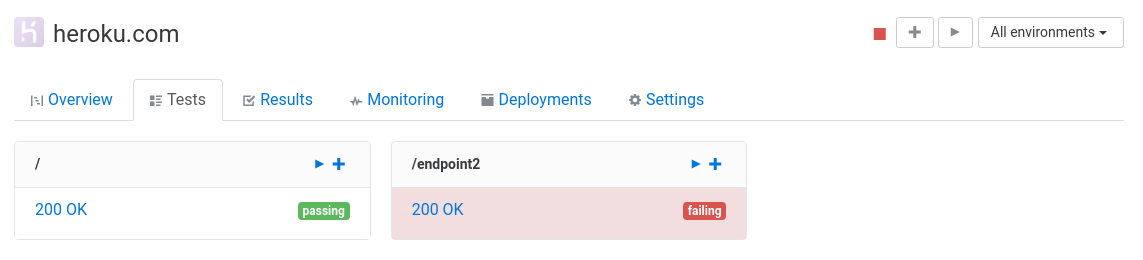
- Test status badges
Create a new test
There are several ways you can create a new test for your web service:
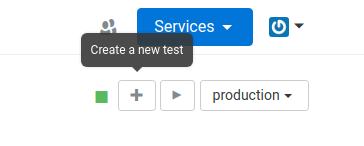
Create a basic test
You can create a basic test from the primary Create Test button in the top-right corner of the service overview:
Choosing this option gives you a blankslate for configuring a new
request, assertions, etc. The authentication will be the service's
default auth and the default endpoint is /.
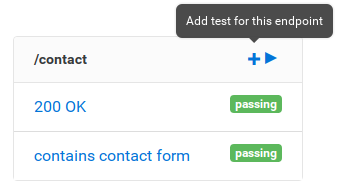
You can also use the "+" plus button on an endpoint card, and this will create a blank test with the endpoint pre-populated:
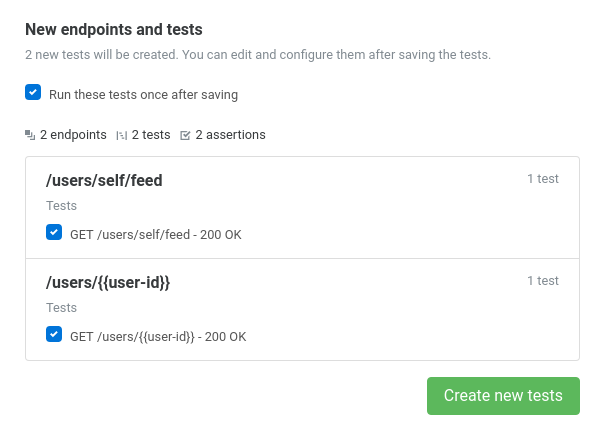
Import new tests
You can also import new tests from a Swagger/OpenAPI specification, Postman collection, or curl command. With a OpenAPI specification or Postman collection, you can choose specifically which tests to import, which makes it easy to keep you Assertible tests up-to-date with your web service.
Syncing tests
If you import your tests from an OpenAPI/Swagger definition or Postman Collection from a URL, you can use Assertible's nifty sync features to re-import tests when the spec is updated. This can be used to update your tests configurations based on changes to your YAML or JSON definition.
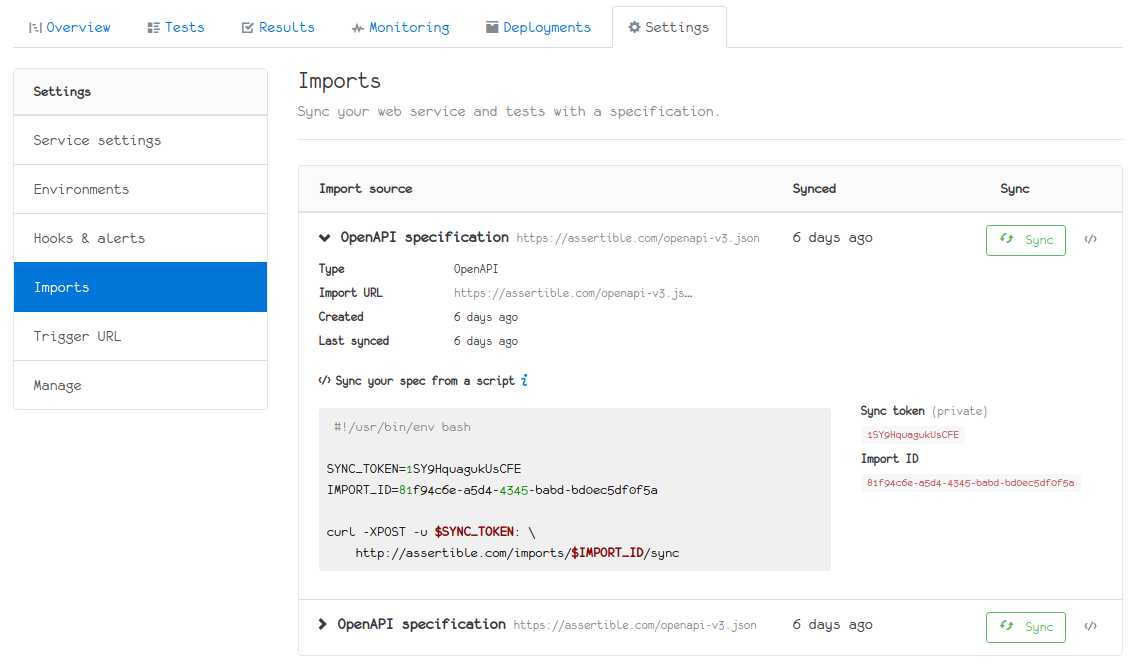
See our docs page on syncing your specification
Configuring a Test
Tests can be configured from the test settings view. From there, you can edit the name, request settings, variables, more.
Sections
- Basic test info (name, description, etc)
- Request configuration (auth, query, etc)
- Test variables (static and environment variables, etc)
- Setup steps (dynamic test variables, etc)
- Teardown steps (post-request actions, etc)
- Tests and assertions (assert status code, etc)
- Hooks and automation (schedules, integrations, etc)
Basic test info
Basic info is all the settings for a test that don't affect the request. All of these settings are available at the top of any test view. The following fields can be updated:
Test Name - Name for your test! (Uniqueness not enforced). In our experience, the test name should be as specific as possible. This helps identify error messages quickly.
Description / Notes - A short description of your test, so other people on your team will know what it's for. GitHub Flavored Markdown is supported. Sometimes it's useful to put a use-case or expected input/output in this field.
Request configuration
At it's core, a test is a single HTTP request. The reason Assertible only utilizes a single request for a test is:
- Tests are hermetic
- Reproducibility
- Deterministic
- Better failure messages.
NOTE: You can chain multiple HTTP requests by using setup steps.
Everything about your test's HTTP request can be configured from the test view. By default, a new test will have enough information to be runnable. You can additionally configure the following:
HTTP Method
The HTTP method for the request. Can be GET, PUT, POST, PATCH,
DELETE, HEAD, OPTIONS.
HTTP Scheme
The HTTP scheme. Can be http or https.
HTTP version
You can use a specific HTTP version. The default is 1.1; other
options are 1.0, 0.9.
Host (base URL)
The base URL is a static field from the web service default environment.
The base URL is visible but cannot be changed.
Endpoint
The path part of the URL. For example,
in assertible.com/signup, /signup would be the
endpoint.
Authentication and Authorization
Authentication used for the test's request. This field is designed to override any authentication specified for the web service or environment.
Supported auth types are Basic Authentication, Digest Authentication, OAuth v1.0a, OAuth v2.0 Bearer Token, and API Token Auth.
If you have an auth type that is not supported, you can probably set any auth headers manually.
Use cookies
If checked, all HTTP requests invoked by a test including setup steps.
For example, if you have a setup step
that calls a /login endpoint, and requires Cookie headers to be
persisted for all subsequent requests.
Max redirects
The maximum number of HTTP redirects allowed before aborting the
request. The default is 2, maximum is 100.
The number of max redirects is also applied to all setup and teardown
steps. For example, if your test has a "max redirects" value of 0, no
redirects will be preformed in any setup, teardown, or main test
requests.
Response timeout
Response timeout configures the number of seconds the request is allowed to run before timing out. The default response timeout is 30 seconds; it can be set up to 180 seconds (3 minutes). If the request runs longer than the response timeout setting, the test will fail with a core assertion failure.
Note that when adding tests to a schedule for monitoring, the total timeout for all test steps cannot exceed the schedule frequency. As a simple example, a test with a max response timeout of 120 seconds cannot be enabled on a one minute schedule.
Variables
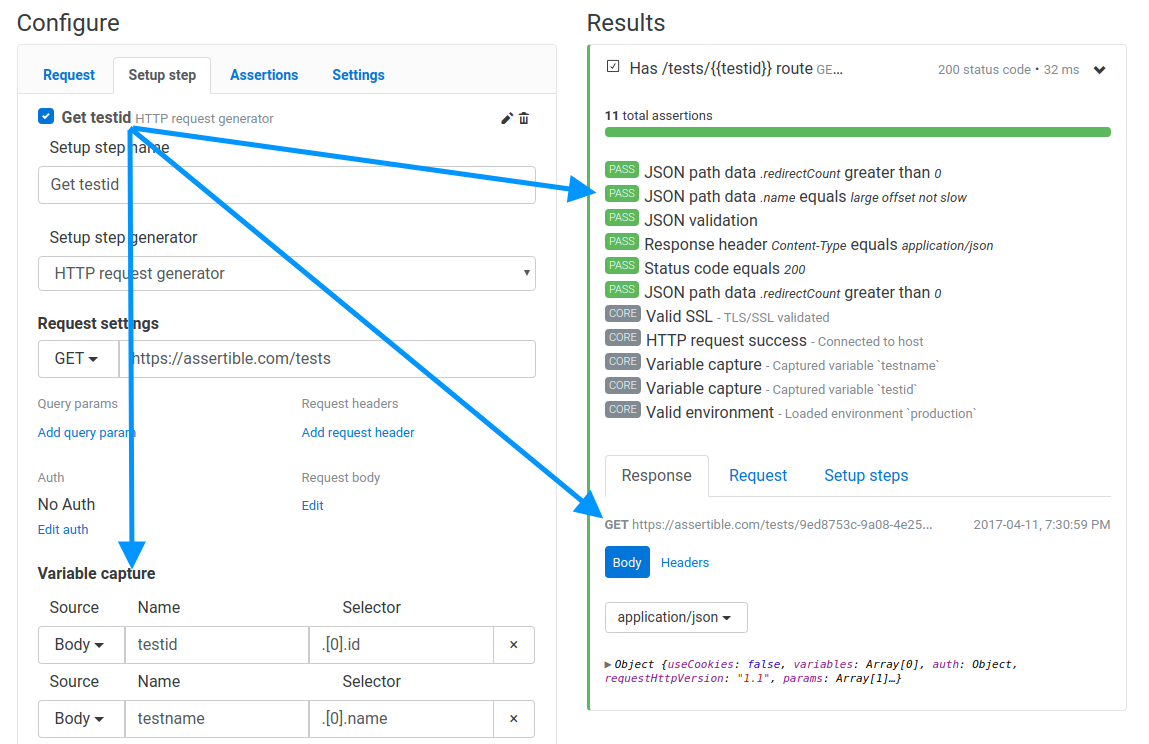
Variables provide a way for you to insert dynamic data into certain
parts of a request, like the endpoint. For example, let's say you're
testing this endpoint: /tests/{{testid}}. You can populate the
{{testid}} part before the test is run. In the image below,
{{testid}} will be substituded with a UUID:
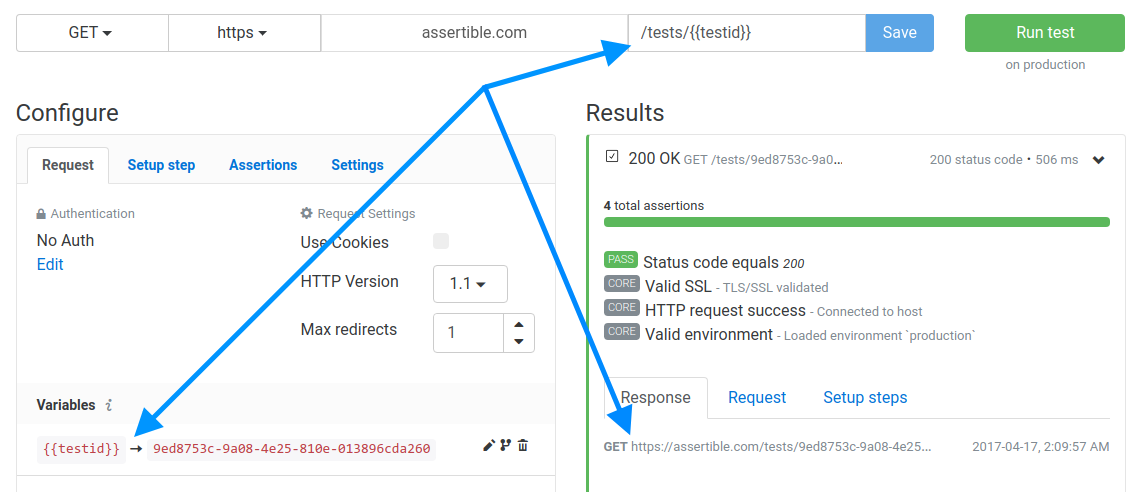
In the above example, every time the test is run the final URL will
be: https://assertible.com/tests/9ed8753c-9a08-4e25-810e-013896cda260.
Variables can be defined in the 'Variables' section of the test configuration, in the environment, or in a setup steps. Variables can be used in the following parts of a test:
You can splice a variable into any of the above fields by using
mustache-like template syntax: {{...}}. If a variable is used, but
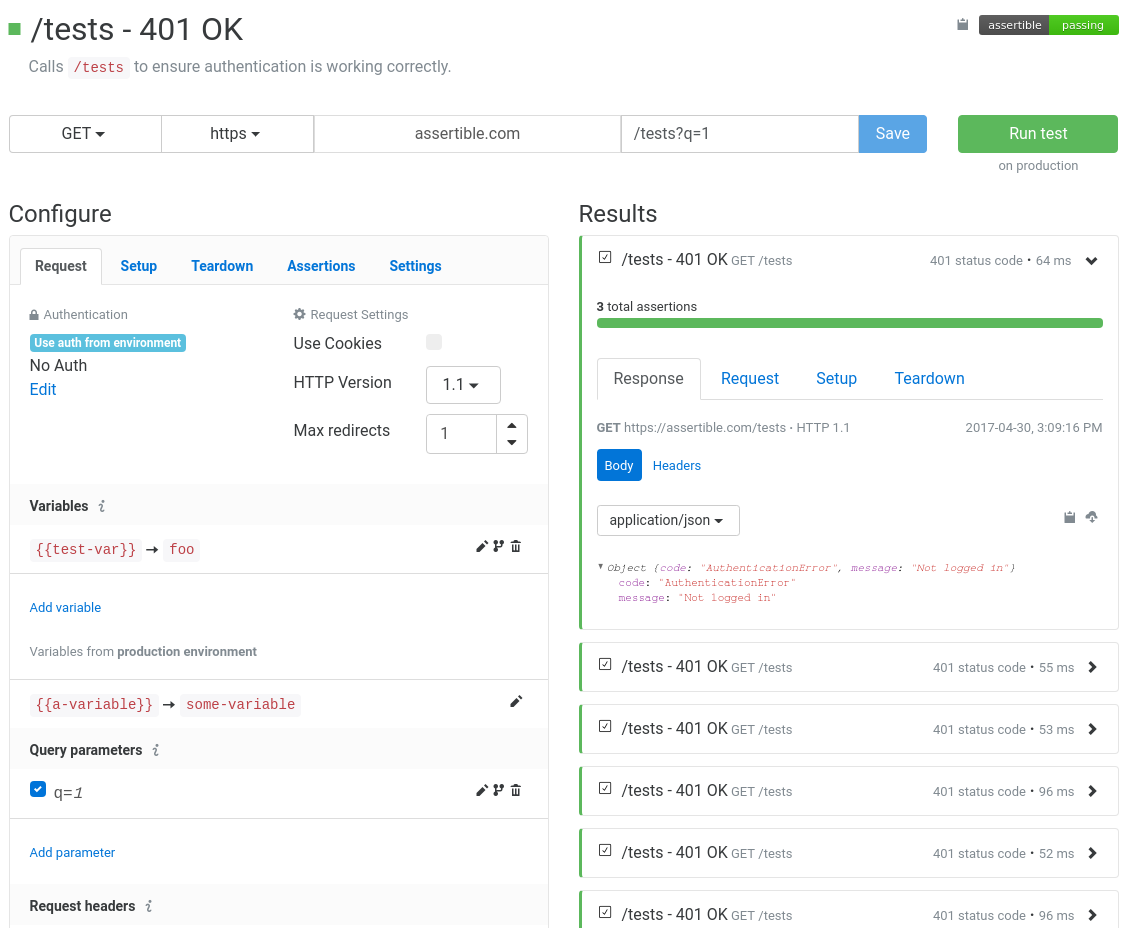
not defined, the test will fail. The
test result will show you the reason for
the failure.
Default test run variables
Assertible defines a few environment variables that are supplied by default to all tests:
testResult.timestampTime the current test started executing. In a test run with multiple tests, this variable will be different for each test. This is a UTC timestamp.executionEnvironment.urlThe URL of the current test run execution environment. The environment URL can be used from any step to ensure your request URLs are fully parameterized.
Encrypted variables
Encrypted variables provide a way to store tokens, passwords, and all sensitive data required by your tests to improve your team's API testing security practices.
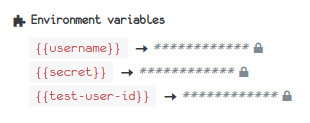
Encrypting a variable is easy: anywhere you can create a variable, click the Encrypt variable check-box. Once your variable is saved, you're done:

How encrypted variables work
To understand how encrypted variables work, here is some basic information describing the security model we have developed:
Encrypted variables are not stored on disk and never sent over the wire in an unencrypted format (e.g. plain text).
Encryption is done on the client-side, using an RSA public key that is specific to your individual web services.
Once a variable has been encrypted, it cannot be displayed or further edited.
Only the Assertible test runner has access to the private keys that are necessary to unencrypt encrypted variables.
Limitations of encrypted variables
To fully understand a security model, it's critical to identify its limitations. This allows us to gain an understanding of what it can and cannot guarantee.
If an encrypted variable is interpolated anywhere in an HTTP request, it will be transmitted over the wire unencrypted.
This means that interpolated encrypted variables will end up in request logs; both in Assertible's dashboard and possibly your servers, depending on the extent to which your server logs request details.
Members of your team can retrieve the plain text of an encrypted variable by interpolating the variable in a field that may be logged by the test runner or your server, such as a request body.
Transform variables with jq
It's possible to transform and manipulate the value of variables
using Assertible's .jq() function. This function is a direct
interface into the data processing program
jq. This makes it possible to
format dates, do math on numbers, concatenate strings, and much much
more.
Using the jq function
To use this functionality, all you have to do is call this method anywhere you use a variable or in the JSON Path Data assertion.
For example, assuming you have a variable named {{json}}, you can:
Get the length of a value:
{{json.jq('length')}}Add two fields from the value of a variable:
{{json.jq('.field1 + .field2')}}Create a timestamp from a string:
{{json.jq('. | fromdate')}} # more simply: {{json.jq('fromdate')}}
See the jq user manual for a full list of supported
functions. Also see the changelog
blog post for more examples. If
you need any help or assistance with this feature, feel free to reach out any
time and we'll be happy to help.
When using the .jq() function from the JSON Path
assertion, simply ignore the
surrounding variable expansion syntax {{ ... }}. This is because the
assertion's JSON Path syntax is not bound to a variable but still allows all
functionality to be utilized.
NOTE: Assertible does not support jq
functions that return a stream of values. The operation must
return a single value.
Accessing variables from jq
It is possible to access other variables within a jq expression by using
$-syntax. As an example, given the variables
| Name | Value |
|---|---|
var1 |
{"age" : 23} |
var2 |
"age" |
the expression
{{ var1.jq('.[$var2]') }}will result in 23.
jq expression.
Manipulating timestamps using jq
Manipulating timestamps is a common workflow when using jq to dynamically
resolve variable values. Using the default test run
variable
{{testResult.timestamp}} makes it possible to create timestamps based on the
time of test execution, e.g. the current time.
- Format a date/time string relative to the test's execution time / current
timestamp:
{{testResult.timestamp.jq('sub(".[0-9]+Z$"; "Z") | fromdate - 86400 | strftime("%Y/%m/%d")')}}
sub(..) portion is needed to
remove the milliseconds of the test results timestamp and cleanly
parse it.
A simpler way to achieve this is to use the JSON path fromdate built-in:
{{testResult.timestamp.fromdate().jq('. - 86400 | strftime("%Y/%m/%d")')}}Query parameters
Add query parameters to the request.
Query parameters can be disabled for debugging purposes by checking the checkbox next to the corresponding query parameter. If the checkbox is not checked, the query parameter is disabled and won't be used in the request.
Note: No url or percent encoding is done by Assertible.
Request headers
Add custom headers to the request. This is useful for manually setting auth or other service specific information.
Request headers can be disabled for debugging purposes by unchecking the checkbox next to the corresponding header. If the checkbox is not checked, the request header is disabled and won't be used in the request.
Request body
Set a request body.
x-www-form-urlencoded
A set of key value pairs. When using this request body type, Assertible handles URL encoding special characters. URL encoding is done after variable replacement.
multipart/form-data
A set of key value pairs representing a
multipart/form-dataupload.The multipart boundary is generated automatically. A
Content-Type:
multipart/form-data; boundary=...
header is also created automatically and will override any existingContent-Typeheader configured for the test.Raw
A raw request body. Assertible does not URL/percent encode or otherwise modify raw request bodies in any way before submitting to the remote server.
Setup and teardown steps
Setups and teardowns are steps that are run before and after the test itself is run. This makes it possible to create multi-step tests for more complex testing requirements. These steps are re-usable across all tests on the web service and can be enabled on any test.
With setup steps, you can make a separate HTTP request and capture the response, generate random variables, or pause for a period of time before running the test.
Teardown steps allow you to run additional HTTP requests after the
test is complete, for tasks like cleaning up left over from a PUT
request.
Setup steps
Setup steps allow you to create test variables before your test is run by capturing them from an HTTP request or generating random data. There are two types of setup steps:
There are many use-cases for setup steps, like fetching an auth token to use in your test, or logging into a website to create a session cookie. In all of these cases, you can use setup steps to describe how to fetch and populate variables before your test is run.
Setup steps can be configured on the Setup step tab of the test configuration page.
Multiple setup steps
Multiple setup steps can be configured to test more complicated scenarios, setup pre-requisite dynamic data, and chain HTTP requests. Simply enable two or more setup steps, then drag and drop the steps into the desired order.

You might notice that you can only make assertions on the core test request. This is intentional to ensure that the test focuses on testing a specific endpoint and error messages are specific as possible.
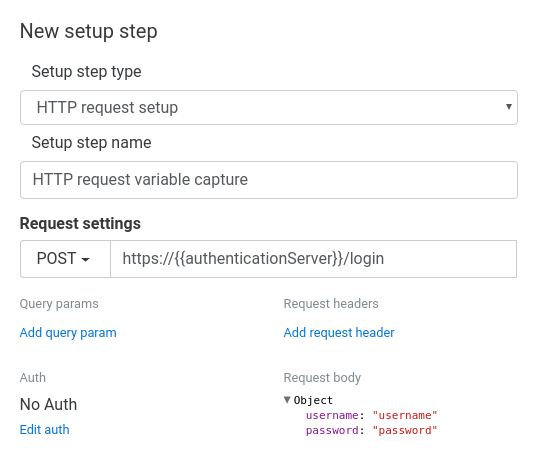
Using variables in setups
When creating a setup step, you can use variables from the environment and previous setup steps in the configuration. They can be used in any field of a setup step configuration except the name and the name of any captured variables.
For example, if you have
an
environment variable
name {{authenticationServer}}, you can use that variable within a
setup step definition. In the image below, an environment variable is
used as the request host on
an HTTP setup step:
HTTP request generator
The HTTP Request setup step allows you to make an additional HTTP request before the main test is run. You can capture data from the HTTP request, save it in a test variable, and use it throughout your tests.
HTTP request variable capture
With an HTTP request setup step, you can capture variables from the response to use in your test and in teardowns.
Each variable capture requires three fields:
Name
This is the name of the variable, which you can then use throughout the test. For example, you can name the variable
userIdand then use it as{{userId}}.From
This field specifies which part of the request to capture the variable; either from the response header or response body.
Selector
The selector describes how to capture a variable. For example, if From is JSON body, then this is a JSON path selector, if From is XML body, then this is an XPath selector, and if it From is Header then this is the name of the response header. If From is Text body, then the selector is not configurable and the variable is populated with the entire contents of the response body.
HTTP request setup examples
For example, if you want to test a POST request to create an entity
and a subsequent GET request to fetch the entity, you would have a
test comprised of two steps:
POST /itemin your setup step, and save theidfrom the response.GET /item/{{id}}in your test by using theidvariable.
Setup steps can also be used without populating any variables. For example, if you want to perform a test as a logged in user, you would have a login request in your setup step:
POSTlogin form to/loginin your setup stepGET/accountorPOSTa form to/formin your test step
NOTE: Ensure the use cookies setting is enabled if you want sessions to persist between your setup step and test.
Random generator
A Random setup step allows you to generate random data, save it
to a test variable, and use it
throughout your tests. This is useful in cases where you don't need
to fetch any specific data, but you need to, for example, populate a
userName query parameter.
Random setup variable capture
Capturing a variable in a Random setup generator only needs two fields:
Type
The type of random data to generate. This can be Random Text, Random Number, or Random UUID.
Name
This is the name of the variable, which you can then use throughout the test. For example, you can name the variable
userIdand then use it as{{userId}}.
Pause step
A Pause step step allows you to priefly pause for a duration
between test steps. The pause duration is represented in seconds
with a minimum of 0.1 seconds and a maximum of 30 seconds.
Teardown steps
Teardown steps are very similar to setup steps, except they are run after the test instead of before. Using teardown steps is useful for things like cleaning up left over test data and logging out of a web service.
Multiple teardown steps can be enabled for a single test to allow for cleaning up data left over from setup steps and running other tasks after the test has completed.
Teardown steps currently support these generators:
HTTP request teardown
This type of teardown allows you to make an HTTP request after the test. The HTTP request can be used to clean up test data, or perform any other post-test actions. Inside of a teardown step, these variables are available:
Additionally, a teardown step can capture variables from the test and use them in it's configuration. Check out the teardown examples for more information.
HTTP request teardown variable capture
In addition to using variables defined in the test, environment, and setup steps, a teardown can capture variables from the test's response. To capture a variable in a teardown step, the following configuration is available:
From
Which part of the test response to capture the variable. This is either Response body or a Response header.
Name
The name of the variable which can then be used within the teardown. For example, if the name is
userIdthen the{{userId}}variable is available.Selector
The selector describes how to capture a variable. For example, if From is JSON body, then this is a JSON path selector, if From is XML body, then this is an XPath selector, and if it From is Header then this is the name of the response header. If From is Text body, then the selector is not configurable and the variable is populated with the entire contents of the response body.
HTTP request teardown examples
Teardown steps are most useful for cleaning up data left over from the
test. For example, imagine a scenario that test's PUTing an
entity. This flow could be accomplished by:
- Call
POST /itemin a setup step to create a new item, and save theidreturned from the request in a variable. - In the test, make a request to
PUT /items/{{itemId}}using the variables saved from step 1. - Call
DELETE /item/{{itemId}}during the teardown step, to delete the item created in the setup step.
This test structure is ideal because it allows tests to define and create their own dependencies, leaving little room for flaky failures because it doesn't rely on a complex sequence of requests before the test.
Tests and assertions
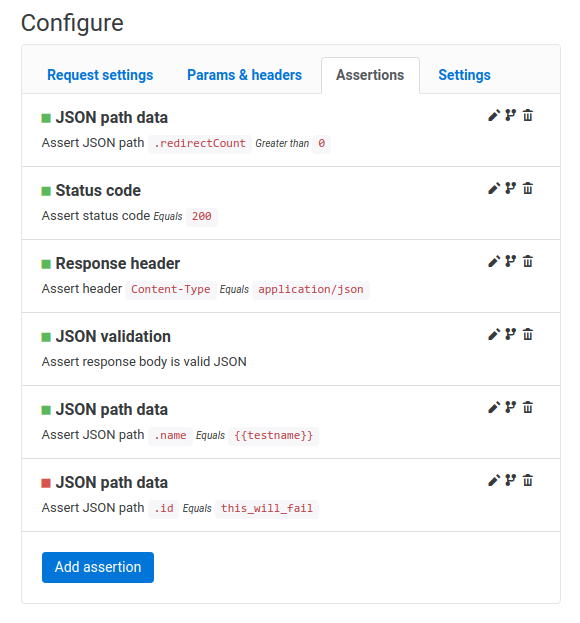
You can add and manage your test's assertions on the Assertions tab of a test's configuration view. For more information on how to configure assertions, check our assertions documentation.
Test Badges
Each test has an embeddable badge for displaying the current status of only that test's assertions. You can use this to communicate current test states with team members or within documentation pages. The badge will display the current test result state at any given time.

You can also create a test badge for a
specific environment like
staging or production by using the environment query parameter
on the trigger url.
Badges can also be created for an entire web service.
Embedding badges
You can find and copy the badge image URL on any test's page, and use it outside of the dashboard. More specifically, there is a copy button next to the badges in the dashboard which will copy the markdown for the badge directly to your clipboard. Here are a few examples of using badges:
Badge monitoring test on production
https://assertible.com/tests/{{test-id}}/status?api_token={{token}}Badge monitoring test on staging
https://assertible.com/tests/{{test-id}}/status?api_token={{token}}&environment=stagingMarkdown:
[]HTML:
<img src="https://assertible.com/tests/{{test-id}}/status?api_token={{token}}" alt="Assertions Status" />The easiest way to test and
monitor your web services
Reduce bugs in web applications by using Assertible to create an automated QA pipeline that helps you catch failures & ship code faster.