Learn how to set up an automated API testing and monitoring pipeline based on a Swagger or OpenAPI specification.
![]()
Testing your API using information from a Swagger/OpenAPI specification is simple using Assertible. There are only 3 steps:
- Import a Swagger definition
- Configure parameters and auth
- Setup automated monitoring and post-deploy testing
1. Import a Swagger definition
To get started, create an Assertible account and log-in. The first thing you should see is an import form:

Psst! If you already have an account, click the **Services** drop-down in the top-right navigation then click **New web service**.
Next, click the "or import your Swagger spec" link. Enter the URL to your hosted Swagger spec in the text input or select File in the drop-down to import a file.
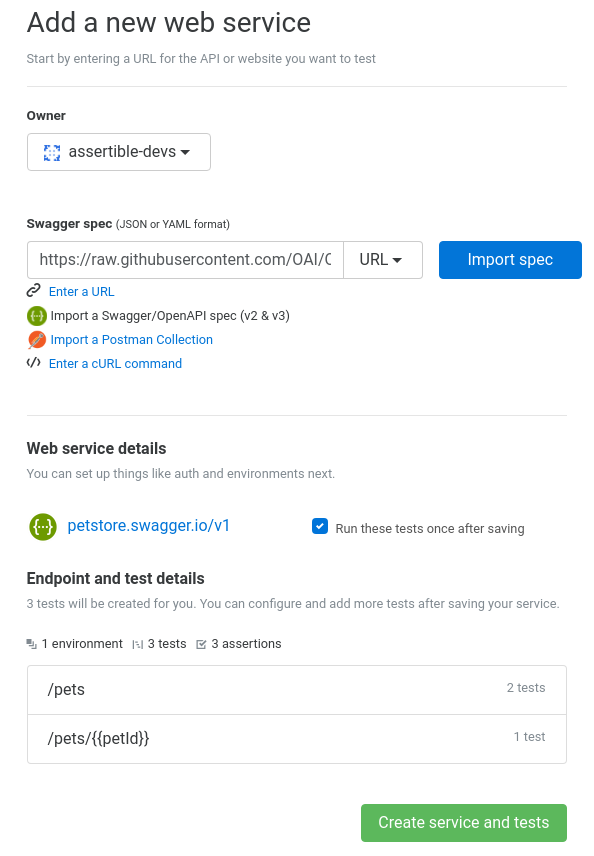
When you click Import URL, you will see a preview of the web service and tests that will be created. For each endpoint/method combination in your spec, Assertible will create one test. If you have a lot of tests, uncheck Automatically run these tests checkbox.
In the example picture above, I'm using a Swagger spec I created for the public GitHub API. Clicking the Import spec button shows that there will be 6 tests imported.
To finalize the import, click Create service and tests. Assertible will redirect you to your new web service's overview page.
2. Configure parameters and auth
If your Swagger definition is non-trivial, you likely have parameters and security definitions that need to be configured before your tests will pass.
Parameters:
For each parameter in your Swagger definition associated with a
specific endpoint, Assertible will create a test variable
automatically. If the parameter does not have a default value defined
in the OpenAPI spec, Assertible will set the value as undefined.
Navigate through each test and check the Variables section in the test configuration view (bottom right corner of the picture below).
For the GitHub API, one test I imported has a {{username}} parameter
defined in the path with no default. Assertible has set the variable
value as undefined. Simply update the variable to a hard-coded
value. If you need dynamic variable data, for example from another
HTTP request, use setup steps.

Auth:
When you first run your tests, they may fail due to HTTP request requirements like auth, headers, or query parameters.
If your Swagger definition defines any security schemes, most of the work is already done. Navigate to your web service's Settings tab, and look for the Authentication view.

The public GitHub API does not require auth explicitly. However, it
does require a User-Agent header. Headers can be created on the test
configuration page right under Variables (the Request headers
view).

In the example above, the test is in a failure state because I haven't
created the User-Agent header yet. After creating the User-Agent
header my test will be passing.

3. Setup automated monitoring and post-deploy testing
The next step is to configure automation to ensure your web service is continuously tested. Assertible supports several types of automation:
Monitoring
Every basic API monitoring stack should have scheduled test runs. To configure scheduled monitoring in Assertible, navigate to the Monitoring tab and click Setup up a schedule:

You should see a form to create the schedule. Select Hourly schedule or Daily schedule from the Frequency drop-down. Finally, hit Create schedule to finalize your configuration.

Alerts
Now that you have schedules set up, you'll need to be alerted when there are test failures. To configure alerts, navigate to the web service Settings tab, and click Hooks & Alerts. You should see options to configure Slack, Email, or Zapier.

At Assertible, we use Slack notifications for test failure alerts and a Zapier trigger to open new issues on GitHub when critical tests fail. If you just want a simple email notification, click the Add one now link in the Email hooks view and then click Add Hook.

Post-deploy testing
Schedules are only one piece of the monitoring puzzle. Ideally, your API tests are executed every time you deploy a new version of your API; especially if you have a continuous integration and delivery pipeline.
Navigate to the Deployments tab and check out the Bash / Command-line example.

Integrate this script into your deployment pipeline or execute it manually after you deploy. Assertible records the deployment version in your test results so that you can track regressions when tests fail after a specific version of your API is deployed.
Post-deploy testing is not strictly required but is a great way to augment your continuous integration pipeline or deployment process.
Conclusion
That's it! Using Swagger in combination with Assertible is a pretty easy way to reduce the burden of creating many redundant tests.
What does your API testing setup look like? Shoot us a message on Twitter and let us know! Check it out and sign up for a free Assertible account to start testing every single deployment!
Examples and further reading:
- Set up a continuous testing pipeline with Node.js
- Automate smoke tests for a Go API on Heroku
- More about the Deployments API
:: Christopher Reichert
Categories
The easiest way to test and
monitor your web services
Reduce bugs in web applications by using Assertible to create an automated QA pipeline that helps you catch failures & ship code faster.
Recent posts
Tips for importing and testing your API spec with Assertible 05/26/2020
New feature: Encrypted variables 10/30/2019
New feature: Smarter notifications 5/17/2019