With more teams adopting CI and CD practices, running automated tests and checks during these builds is a natural next step in ensuring the quality of an API or web application. In this post we'll look at how integrating Assertible with a TeamCity build makes it easy to catch and react to failures in your software.
TeamCity is a popular and powerful continuous integration and delivery tool created by JetBrains. It contains powerful out-of-the-box features that make it easy for anyone to set up an enterprise-level CI pipeline.

There are two primary times to run tests against a web application being built and deployed from TeamCity. First, is before the application is deployed, and second is immediately after it has been deployed. Below we'll look at the reasoning behind this and learn how to set up and run these types of tests. Here's an outline of the process:
- Create tests for your web app
- Adding a build step to TeamCity
- Viewing test results in Assertible
- Configure test failure notifications
Create tests for your web app
If you're already set up with Assertible, skip down to configuring TeamCity below.
Assertible makes it easy to create automated tests for your API, web
application, or website. These checks help validate that your web
service is working as expected. All you need to get started is a URL,
Swagger/OpenAPI specification, Postman collectionn, or a curl
command. For more info, check out the Getting Started section
of the documentation.
For this post, I'll be testing an example Node.js API (code on GitHub). I've already created some tests for this service you can see in the image below, and the goal is to automatically run these tests during a TeamCity build:

The tests for this API will run tests and checks that will validate the status code, response headers, and response body of the various endpoints. Assertible has many more types of checks you can make too, too - check out the assertion documentation.
Mentioned previously, there are two primary times during the TeamCity build we want to run the tests. Here's the process and reasoning for pre- and post-deployment testing:
Testing before deployment with Triggers
Just like unit tests, we want to run the Assertible integration and functionality checks before the new application is deployed. This allows for a comprehensive set of validations to be run before the changes make it to any users.
This is done with an Assertible Trigger URL. A Trigger URL allows you to run your tests from anywhere outside of the Assertible dashboard and it works great inside of CI/CD build. Here's an outline of how we'll use the Trigger in TeamCity:
- Push code and initiate a build normally.
- Add build step to run the application under an
ngrokproxy. - Initiate tests and checks with the Trigger URL.
- Continue with deploying the application.
I'll cover this process more thoroughly below, but for now all you need to know is that your Trigger URL can be found on the Settings tab of a web service in Assertible and all of the available Trigger options can be found here.
Validating releases with the Deployments API
In addition to testing the application before deployment, we also want
to validate the service after it has been deployed. This is
important because even in the best CI
environments,
differences in production/staging/etc are always there. This
process looks like this:
- Push code and initiate a build normally.
- Deploy your application to an environment (
production,staging, etc). - After the deployment, call the Deployments API to test the new release.
Post-deployment testing is something that has, so far, been unique to large organizations with the time and resources to set up their own test automation. At Assertible, we created the Deployments API to allow any team to easily start using this valuable process.
A sample Deployments API script can be found on the Deployments tab of every web service in Assertible. More on that below.
Adding a build step to TeamCity
Now that you've created tests and checks for your web application and have a good understanding of the ideal process, let's look at integrating these tests into a TeamCity build. For brevity, I'll skip actually installing and configuring TeamCity, but they have great docs on that process.
To reiterate, I'm outlining two different ways of running your tests from within TeamCity, pre- and post-deployment. Let's take a look at setting each of these up:
Pre-deployment testing with Trigger URLs
The basic idea is that after the application has been built in CI, but before it has been deployed, we can run a series of tests on the application to ensure that the new changes are working as expected.
Integrating these tests into a TeamCity build with Assertible is straightforward, let's walk through it:
First, add a new step to your TeamCity build from the build configuration page:

To use the Trigger URL you only need to run a single command. Choose the Command Line runner type when configuring the step. And be sure to select the correct type of step depending on your environment, Linux or Windows.
Within the new Command Line build step, add a script to build your application, start
ngrok, and call the Assertible Trigger URL (example script below):
This script does a few things before calling the Trigger URL to run the tests. Essentially it starts the application, downloads and starts
ngrok, then calls the Trigger URL and fails the build if any of the checks fail. I've commented the example below, so let's walk through it:# Start the app and store the process ID in an `APP_PID` variable node app.js & APP_PID=$! # Download and install ngrok curl -s https://bin.equinox.io/c/4VmDzA7iaHb/ngrok-stable-linux-amd64.zip > ngrok.zip unzip ngrok.zip ./ngrok http 5000 > /dev/null & # Sleep for 2 seconds to allow ngrok to initialize sleep 2 # Store the `ngrok` URL in the `NGROK_URL` variable NGROK_URL=$(curl -s localhost:4040/api/tunnels/command_line | jq --raw-output .public_url) # Call the Trigger URL and store the results in the `RESULTS` variable # Note that we tell Assertible to run the tests against the `NGROK_URL` # We also tell Assertible the environment, in this case the TeamCity BUILD_NUMBER RESULTS=$(curl -s -XPOST -u $TOKEN "https://assertible.com/apis/$SERVICE_ID/run" -d'{ "environment": "'"$BUILD_NUMBER"'", "url": "'"$NGROK_URL"'", "wait": true }') # FAIL the build if any tests failed, otherwise exit 0 ! echo $RESULTS | grep -q TestFailThe last line is particularly important. It will fail the TeamCity build if any API tests fail to prevent a faulty application from being deployed. This script is just to serve as an example and can be modified for your specific use-case.
And there you have it: pre-deployment integration tests for your web service run within a TeamCity build that will fail and alert your team if any checks don't pass. Next, let's look at how to test an application after it has been deployed.
Post-deployment testing with the Deployments API
Now you want to run tests and checks against your application after
it has been deployed to verify that everything is working
correctly. To do this you can use
the Deployments API from Assertible. As new
changes are released to production, staging, or any other
environment, it becomes time consuming to test things manually - let's
automate that away.
The basic idea is that after an application is deployed, you tell Assertible about it, and Assertible will run tests against the new release and save the details for future reference. This is quite a bit simpler than the pre-deployment testing, so let's set it up:
First, add a new build step to your TeamCity build. It's important that this step is run after your deployment step so that Assertible is testing the new changes in your code, like the example below:

Like the Trigger URL example above, the new build step simply needs to use a basic command line configuration. Choose the correct type of step depending on your environment, Linux or Windows.
In the new build step, add a command that calls the Deployments API to run tests against the new release:

There is a sample command available on the Deployments tab of a web service in the Assertible dashboard. You copy/paste that command directly, making any necessary changes. Here's how it looks:
curl -u $ASSERTIBLE_TOKEN: -XPOST --fail https://assertible.com/deployments -d'{
  "service": "'"${ASSERTIBLE_SERVICE_ID}"'",
  "environment": "production",
  "version": "'"${CIRCLE_SHA1}"'",
  "ref": "'"${CIRCLE_SHA1}"'"
}'
When you call the Deployments API Assertible stores the information about the release and runs tests against the new version. The release history of your application, along with the status of the tests, can the be viewed in the Assertible dashboard for an easy way to track regressions in your API.
There are several options available when calling the Deployments API that allow you to specify the environment, the VCS ref, version number, and much more. Check out some more examples here. Next I'll show you where to find and inspect your test results in Assertible.
Viewing test results in Assertible
Now that your TeamCity build is configured to run Assertible tests against the application pre- and post-deployment, let's look back at the Assertible dasboard for the viewing the full test results.
Every time your build is run, the Results tab of your web service will automatically update with the latest results. For example, in the test result below you can see they were run via trigger URL:

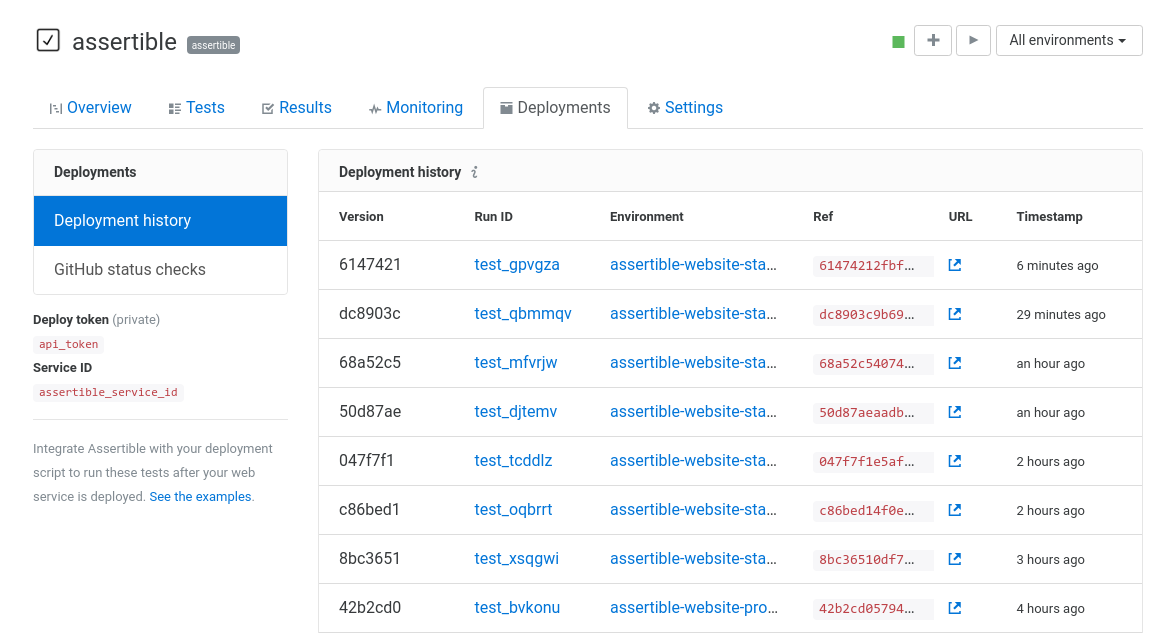
It's also useful to see a history of your application deployments, along with the test results that were run for that release. This information can found on the Deployments tab of every web service, like the example below:

More information and examples on viewing test results are in the docs here.
Configure test failure notifications
One of the most important parts of continuous testing is getting alerted of web service failures. Assertible has several options you can use to customize how and when you're notified of test failures. These are the most popular options:
Email hooks
Email hooks allow you to receive a notification when you tests fail, or every time they are run.
Zapier hooks
You can also integrate Assertible with Zapier to trigger a flow every time your tests are run. This allows you to do almost anything you want with your results, like sending them to an issue tracker, logging them with webhooks, and more.
Slack notifications
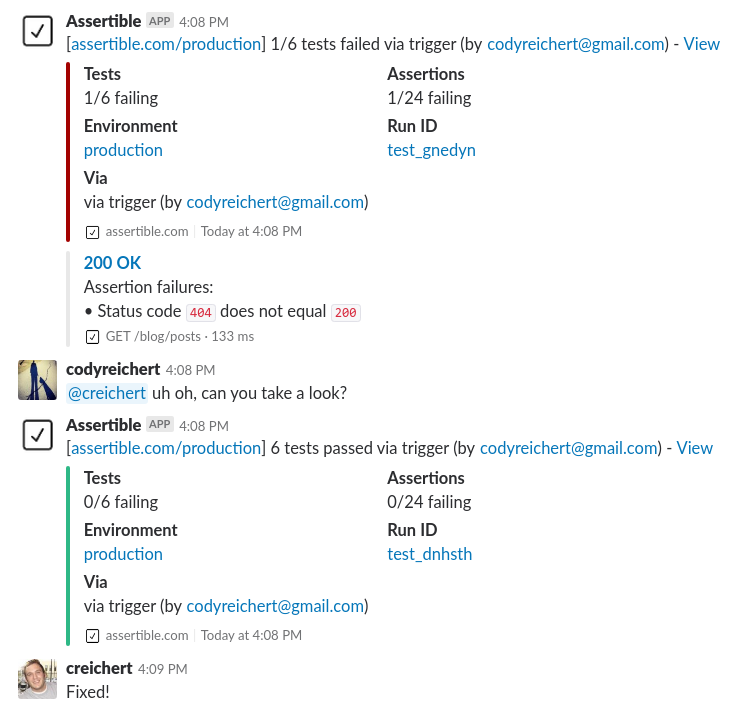
The most popular way of receiving alerts about your tests is with the Slack integration. This integration allows you to send a message to a channel when tests pass and/or fail. Slack notifications are ideal for teams where multiple people are in charge of responding to web service failures.

Wrapping up
With Assertible it's easy to add automated API or web application testing to your TeamCity builds. This provides another valuable layer in ensuring the quality of your application and reduces the time required to make manual checks on new changes.
Below I've gathered a few more resources on using Assertible, integrating other CI providers, and making your QA testing processes more efficient:
Resources and tutorials
- Add GitHub status checks for Assertible deployment testing
- Automated API testing with Jenkins
- Add post-deploy smoke tests to any Codeship pipeline
- Tutorial: Automate smoke tests for a Go API on Heroku
Have any questions or comments? I'd love to hear it! Let's chat on on Twitter or reach out to me directly, I'd love to hear from you!
:: Cody Reichert
Categories
The easiest way to test and
monitor your web services
Reduce bugs in web applications by using Assertible to create an automated QA pipeline that helps you catch failures & ship code faster.
Recent posts
Tips for importing and testing your API spec with Assertible 05/26/2020
New feature: Encrypted variables 10/30/2019
New feature: Smarter notifications 5/17/2019