Assertible's automation lets you integrate web application testing with the tools and services you already use. If a critical API is down, has a slow response time, or fails any other assertions, you can set up automation and hooks to alert you or process some other action.
API testing automation with Assertible is extremely useful because of the way assertions work. You can run your web service tests continuously throughout the development cycle and get alerted early when there's problems with a release.
Sections

Integrations
Integrations are a means to hook your test runs and results into other 3rd party services, like a team chat. Good, timely, and reliable integrations are crucial for teams sharing information.
The currently supported integrations are:
GitHub Deployments 
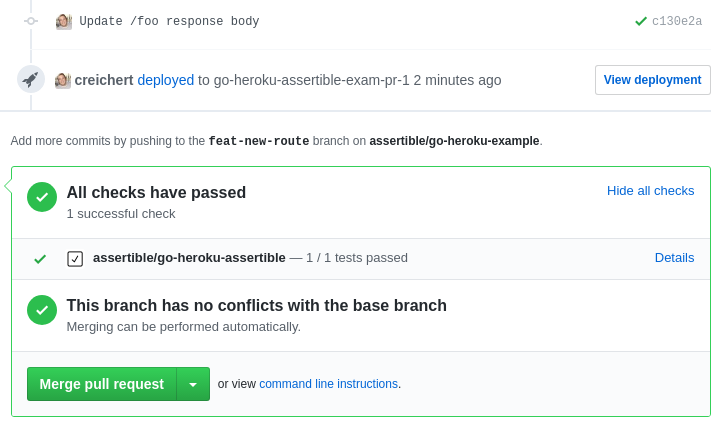
Connecting your Assertible web service with a GitHub repository allows you to propogate deployment events and tests failures to pull requests and commit references every time you deploy.
GitHub quick start
There are 2 steps required to make use of the Assertible GitHub integration:
Connect Assertible to GitHub
Connect an Assertible web service to GitHub by navigating to your web service's Deployments tab. On the left hand sidebar, click GitHub status checks.
If you have never configured GitHub in Assertible before, you should see an Add to GitHub button that allows you to connect, as seen in the image below.

Once you have granted Assertible the necessary GitHub permissions, you can select a repository to send/recieve deployments events from, like in the image below.
repo and
repo_deployment scopes. This is true if you are an
Owner, Admin, or have write access to the
repo.

Check out our listing in the GitHub integrations directory.
Post deployments to Assertible
In order for Assertible to run tests when your web app or API is deployed, it must receive deployment events and propogate them to your repository on GitHub.
Deployments API
The easiest way to send deployment events to GitHub is to use the Assertible deployments API.
All you have to do is connect your web service to GitHub, and call
POST
/deployments
with thegithub: trueparameter. See our deployments API examples for how to configure your request.We've put together examples for common CI/CD services in the assertible/deployments repo.
External integrations
If you use an external continuous delivery service like Heroku that is already connected to your GitHub repository, you don't need to use the deployments API.
For example, Heroku Review Apps, creates a deployment event for all apps spun up for every pull request. These events are received by Assertible which runs tests against the web app for each unique environment.
How it works
When you connect Assertible to a GitHub repository, it receives webhooks for all repository events related to deployments. Using the webhook payload, Assertible can determine when your web service has been deployed and will run tests against your app automatically.
Loading an environment
Environment "loading" is the process of identifying the unique url and
other HTTP settings which are specific to an instance of your app. For
example, your staging environments may all be deployed to a unique
environment like https://${branch}.myapp.com or even a static url
like https://staging.myapp.com
The method Assertible uses to resolve the test execution environment from a GitHub deployment event can be broken down into a few steps:
If the deployment event contains an
environmentfield (the unique name of the environment), Assertible checks your environments for a corresponding unique name.For example, if the GitHub deployment event contains
{
  "environment": "staging", ... }
then Assertible will attempt to find a valid environment for the web service namedstaging.This is the primary method used to identify a static environment.
Next, Assertible checks for an
environment_urlin the GitHub deployment status payload. If anenvironment_urlis found, Assertible runs tests against a transient (or "temporary") environment.If the environment can't be loaded, then a core assertion failure is raised and the test runs will fail.
The best way to avoid environment load failures is to create an environment for each static url you deploy your app too (whether staging or production).
Please feel free to contact us if your use-case requires additional support for loading environments.
See the GitHub deployment documentation for more details
Remove the GitHub Deployments integration
To remove the GitHub deployments integration, you need to visit any of your web service's deployments tab in the Assertible Dashboard. From the service page, click the Deployments tab. Find the GitHub Deployments integration you want to delete, and click the trash can icon next to it.
Slack 
Assertible is a turn-key testing solution for monitoring web apps. Developers and QA professionals use Assertible to write and automate tests for API's, websites, and other web services. Assertible tests and monitors your web service's behavior and health. Learn more.
The Assertible integration for Slack is designed to notify you not only when your tests fail, but when they become healthy again for more details.
Send downtime and test failure (or success!) notifications to your team's channel when tests are run.
Reference a high-level overview of test runs directly in Slack.
View the results of a test in Assertible with a single click.
How notifications work
Assertible will notify you via Slack when:
- A test that's healthy starts fails
- A test that's failing becomes healthy
- A test fails consecutively a multiple of 10 times. e.g. on the 10th, 20th, 30th, 40th failures.
Each of these rules is exclusive to a single test/environment combination.
For example, if you have a test named 200 OK that fails on production and
then staging, two notifications will be sent. If the same test fails twice on
production then only one notifications will be sent.
NOTE: If your test was previously configured to send notifications On test failure, your tests will automatically be migrated to use this new feature.
Setup the Slack integration
NOTE: You need a Slack account and a target channel to send messages to (e.g. #dev or #general).
Open one of your web service's in the Assertible dashboard.
Click on the Settings tab then Hooks & Alerts.
Find the Slack alerts integration and select Add to Slack.
Note: The Slack integration can be customized further using the "Preferences" drop-down.
Note: This step will lead you to the Slack website to confirm the integration. If you are not redirected directly back to your test page, navigate back to your dashboard using the "Dashboard button in the site navigation.

PagerDuty 
Assertible's integration with PagerDuty allows you to create a seamless pipline for API monitoring and alerting. With PagerDuty's flexible issue escalation policies and Assertible's automated testing tools, it's easy to customize how and when you get alerted for API downtime.
Sections
Features
- Automatically create incidents when your API tests are failing
- Configure the alert escalation policy for failing tests in PagerDuty
- Auto-resolve incididents when failing tests start passing again
- View the result of failed tests by clicking the incident in PagerDuty

Set up the PagerDuty integration
All free and upgraded accounts have full access to the PagerDuty integration. To enable the PagerDuty integration for you web service, follow these steps:
- Visit your web service in the Assertible dashboard.
- Go to the Settings page and click the the Hooks & Alerts tab.
- Find the PagerDuty incidents section, and click Alert with PagerDuty.

That's it! You will then be redirected to the PagerDuty website where you can follow-the steps to configure the settings for creating incidents. NOTE: You must have a PagerDuty account to enable the integration. Sign up here.
Edit and delete a PagerDuty integration
After you have a PagerDuty integration set up, you can edit the settings and delete the integration from the Alerts & hooks tab on the Settings page of your web web service.
To edit the PagerDuty integration click the trash icon in the top right corner of the card. In this view you can control these settings:
Tests: Select which tests will trigger the PagerDuty integration.Vias: Control when incidents are triggered. (For example, If you uncheck Dashboard, incidents will not be triggered when you manually run tests in your Assertible dashboard)

Note: You can also change the integration's behavior in your PagerDuty dashboard. This allows you to customize how incidents are created.
If you have any feedback or ideas for features we can add to the PagerDuty integration, we'd love to talk to you! Send us a message or chat with us from your dashboard.
Zapier 
The Zapier integration makes it possible to send test results to Zapier by making a Zap that triggers when a test is run on your web service. This opens up many possibilities for how you can see and use your Assertible test result data.
Set up the Zapier integration
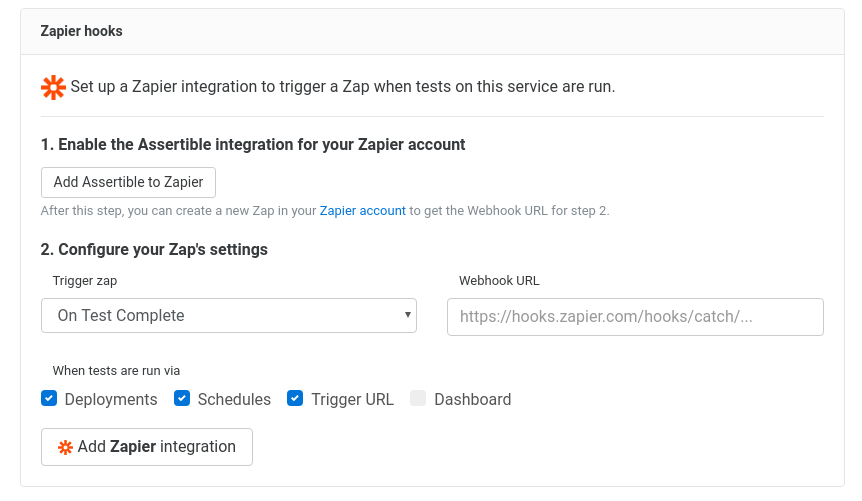
To get started, visit the Settings page of any web service in your Assertible dashboard and find the Zapier hooks section as seen in the image above. From there, follow these steps:
Enable the Assertible app in Zapier
While the Assertible Zapier app is in beta, you must accept an invitation to use the app. You can find this link on the Settings page of any web service in your Assertible dashboard.
Make a Zap
After you have enabled the Assertible app in your Zapier account, you can begin creating a zap in Zapier. Start by selecting the
Assertibleapp, and then choose one of the supported triggers.On the next page, you'll get a Webhook URL from Zapier that you can use in the Assertible, to create the integration. When you have that Webhook URL, proceed to the next step.
Create the integration in Assertible
Using the Webhook URL from step 2, you can now create the Zapier integration in your Assertible dashboard. The different options are described below:
Trigger Zap
This setting configures when the Zap Trigger wil be executed. This can either be
On Test CompleteorOn Test Fail.Webhook URL
The Webhook URL is given to you by Zapier in Step 2.
When tests are run via
The
viasoption allows you to further restrict when the Zap is triggered. The valid options here are:Deployments,Schedules,Trigger URL, andDashboard.
Zapier Triggers
Completed Test trigger
The Completed Test trigger fires each time a test completes. You can
optionally configure this to only run when tests fail. time a test
fails. If multiple tests are executed at the same time (e.g. have the
same Run ID), this trigger will fire for each test result
independently.
Additionally, this trigger can be configured to run based on who or
what executed the test, known as via. For example, via Schedule
will call the Completed Test webhook each time tests are executed
using a schedule. Other values which can be configured are via Deployment,
via Trigger URL, and via Dashboard. Using via helps reduce
executing Zaps unknowingly or at undesired times.
Hooks
Email hooks are the most basic form of test automation for sending alerts about test runs and failures. Hooks are easy to set up and require little configuration and maintenance.
There are three settings to every email hook:
Send email when Configure when test send an email hook. There two options: On test run failure will send an email only when tests in a run fail, if they are enabled for the hook, or On test run complete which will send an email on every test run for test's enabled on the hook.
Send email to The email address to send the test run emails.
When tests are run via The
viasoption allows you to restrict when the hook is triggered. The valid options here are:Deployments,Schedules,Trigger URL, andDashboard.By default,
Dashboardis ommitted to reduce unwanted emails and because it's easy to view the result status in the dashboard.
You can add a new hook from the Settings view of any web service.
How email hooks work
Email hooks are sent at the end of every test run, assuming the requirements are met for the hook to be sent. The email will contain details about the specific test failures and will highlight patterns in failing assertions that may be helpful in resolving the issue. Here's what you can expect:

Schedules
Monitoring tests can be configuring using schedules with flexible frequency. Schedules allow you to set up hands-off monitoring of any web service and be confident that your APIs are being tested regularly. Assertible currently supports the following schedule settings:
Frequency
- Once per Minute*
- Once per 5 Minutes*
- Once per 15 Minutes*
- Once per 30 Minutes
- Once per Hour
- Once per Day
* These frequencies are only available on the paid plans.
Start Date and Time
Choose the date and time that the schedule will start running. This can be now, or any time in the future.
Trigger URLS
Triggers provide a flexible way to run your tests from anywhere outside of the Assertible dashboard. Every web service and test has a Trigger you can call to, for example:
- Get your Trigger URL
- Trigger URL Parameters
- Trigger URL Examples
- Trigger URL with Heroku Deploy hooks
Triggers make it easy to integrate API testing into your workflow and run your tests when you need them most. Here's a few examples of when using the Trigger comes in handy:
- Running your tests from your API test suite or CI pipeline
- Running your tests against dynamic environments (like
devorqa) - Providing reproducible test cases to other team members.
Psst.. If you are running Trigger URLs from your continuous delivery pipeline to test releases after they are deployed, we recommend using the Deployments API instead.
Get your Trigger URL
Triggers are available for every web service and each individual test. You can find the trigger URLs in your Assertible dashboard in two places:
Web service settings
Navigate to your web service's Settings tab and check the Service Settings view. There will be a Trigger URL field which triggers all tests for a web service.
Test configuration settings
Navigate to a test and check the Configure area under the URL configuration component. Click the Settings tab and look for Trigger URL (you may have to scroll down).
Trigger URL examples
Run tests using a trigger:
curl -XPOST -u $ASSERTIBLE_API_TOKEN: https://assertible.com/apis/123e4567-e89b-12d3-a456-426655440000/runRun tests and specify the environment:
curl -XPOST -u $ASSERTIBLE_API_TOKEN: https://assertible.com/apis/123e4567-e89b-12d3-a456-426655440000/run -d'{
  "environment": "staging"
}'
Run tests against a dynamic URL (known as a transient environment):
curl -XPOST -u $ASSERTIBLE_API_TOKEN: https://assertible.com/apis/123e4567-e89b-12d3-a456-426655440000/run -d'{
  "environment": "my-dynamic-environment-xyz",
  "url": "xyz.staging.megacorp.com/api/"
}'
Run tests for a specific endpoint:
curl -XPOST -u $ASSERTIBLE_API_TOKEN: https://assertible.com/apis/123e4567-e89b-12d3-a456-426655440000/run -d'{
  "endpoint": "/my/endpoint"
}'
Wait for tests to finish and return results:
curl -XPOST -u $ASSERTIBLE_API_TOKEN: https://assertible.com/apis/123e4567-e89b-12d3-a456-426655440000/run -d'{
  "wait": true
}'
Only run specific tests by ID:
curl -XPOST -u $ASSERTIBLE_API_TOKEN: https://assertible.com/apis/123e4567-e89b-12d3-a456-426655440000/run -d'{
  "tests": ["uuid1", "uuid2", "uuid3"]
}'
Run trigger URL using query parameters:
curl -XPOST -u $ASSERTIBLE_API_TOKEN: https://assertible.com/apis/123e4567-e89b-12d3-a456-426655440000/run?environment=staging&endpoint=%2Fmy%2FendpointThis comes in handy in scenarios where specifying a request body may be inconvenient. See Using a Trigger URL with Heroku deploy hooks for more details.
Trigger URL Parameters
These parameters can be configured in the JSON request body or query parameters of a Trigger URL.
| Name | Type/Required | Description | Default |
|---|---|---|---|
api_token |
String required |
Your API access token | n/a |
environment |
String optional |
Run tests against a specific environment. Environments are configured in the dashboard. If your environment is dynamic, use this along with the url parameter to specify a transient environment URL. |
production |
endpoint |
String optional |
Run tests belonging to a specific endpoint. | n/a |
url |
String optional |
Run tests against a specific URL. (This is known as a transient environment.) | n/a |
wait |
Boolean optional |
Wait for all tests in the run to complete before sending the API response, including the final status. | false |
tests |
Array<UUID> optional |
A list of test ids to run. ONLY valid for API trigger URLs. | []* |
* - Only tests specified in this list are run when a web service trigger URL is called.
Trigger URL with Heroku Deploy Hooks
The
Deploy Hooks addon
from Heroku along with the Assertible trigger URL allows you to run
your tests every time your application deploys. You can add the
deployhook to your Heroku app with this command:
$ heroku addons:create deployhooks:http \
    --url=http://assertible/apis/{SERVICE_ID}/run?api_token={API_TOKEN}

Adding deployhooks:http to myapp...Done.
This addon will call the Trigger URL to run your API tests after your
Heroku application is deployed. To get the SERVICE_ID and
API_TOKEN for your service, visit
the Trigger URL settings page in the
dashboard.
Heads up! If your are using the Trigger URL to run deployment validation tests, you can alternatively use the Deployments API to track and test API releases across environments.
Continuous integration
Using Assertible in your CI/CD pipeline is a powerful way to catch and prevent bugs in your API or website and validate that things are working as expected. With Trigger URLs and the Deployments API, you can easily start running API integration tests and post-deployment checks from any continuous integration and delivery tool.
We have a lot examples for integrating Assertible with popular CI services. Check out some the ones below:
CI integration examples
Can't find what you need or need help getting set up? Contact us any time.
Integrating with Codeship
Codeship is a popular continuous integration platform used by thousands of developers across the globe.
Assertible and Codeship work together to provide a powerful continuous testing pipeline that will help you catch bugs before they make it to production. Learn how to set up automated API testing in your Codeship Pro or Codeship Basic builds with these examples:
Integrating with Codeship Pro
You can use Assertible with Codeship Pro to test your web services during your build and after a deployment with just a couple of new steps added to your pipeline. Learn more in these sections below:
- Setting your environment variables
- Triggering tests during a build
- Running checks after a deployment
Setting your environment variables
Start by adding a couple of variables to your codeship-services.yml file:
ASSERTIBLE_API_TOKENASSERTIBLE_SERVICE_ID
These variables are needed for both the Trigger URL and the Deployments API. You can get them out of your Assertible dashboard by visiting the Settings page of the web service you want to test.
Triggering tests during a build
Triggering API tests during a build consists of building and running your app on Codeship, and then using your Assertible Trigger URL to run your tests. To set this up is only a couple of steps:
Add an entry to your codeship-steps.yml file that calls a script in your respository called
assertible.sh:- name: Assertible service: app command: assertible.shAdd the
assertible.shscript to your code base with the following code:# Start your application (NOTE: CUSTOMIZE THIS COMMAND) node server.js & # download and install ngrok curl -s https://bin.equinox.io/c/4VmDzA7iaHb/ngrok-stable-linux-amd64.zip > ngrok.zip unzip ngrok.zip ./ngrok http 5000 > /dev/null & # sleep to allow ngrok to initialize sleep 2 # Download JSON parser for determining ngrok tunnel wget https://stedolan.github.io/jq/download/linux64/jq chmod +x jq # extract the ngrok url NGROK_URL=$(curl -s localhost:4040/api/tunnels/command_line | jq --raw-output .public_url) curl -s -u $ASSERTIBLE_API_TOKEN: $TRIGGER_URL -d'{ "environment": "'"$CI_BRANCH-$CI_COMMIT_ID"'", "url": "'"$NGROK_URL"'", "wait": true }'Note: Modify the first line to the command that starts your application
After adding the steps above, push a commit to trigger a Codeship
build, and tests will be run against your application. Using the
wait: true parameter will fail the build if any of your tests
fail. Learn about more Trigger URL parameters and
options here.
Running checks after a deployment
Testing your application immediately after a deployment is a great way to smoke test and check your web service to ensure the new release is working as expected. To do this, you can use the Assertible Deployments API. Start by adding the following steps to your Codeship project:
Add this
curlcommand to a script calledassertible-deploy.shin your repostory:# POST a new deployment to Assertible, and your tests will run against it curl -u $ASSERTIBLE_API_TOKEN: -XPOST https://assertible.com/deployments -d'{\ "service": "'"${ASSERTIBLE_SERVICE_ID}"'",\ "environment": "staging",\ "version": "'"${CI_COMMIT_ID}"'"\ }'Note: Learn more about the
environmentparameter in the Deployments API documentation.Call this script on all branches that deploy your application by adding it to your codeship-steps.yml file:
- name: assertible
  service: app
  tag: master
  command: assertible-deploy.sh
Note: Make sure to add this step after your deployment step, so tests are run against the new release.
Integrating with Codeship Basic
You can use Assertible with Codeship Basic to test your web services during your build and after a deployment with just a couple of new steps added to your pipeline. Learn more in these sections below:
Setting your API token
To get started, you'll need to add a couple of values to your Codeship project's environment variables:
ASSERTIBLE_API_TOKENASSERTIBLE_SERVICE_ID
These variables are needed for both the Trigger URL and the Deployments API. You can get them out of your Assertible dashboard by visiting the Settings page of the web service you want to test.
Triggering tests during a build
To test your API or web service during your CI build, you can add the following code to a custom-script step your Codeship project's setup commands:
# Start your application (NOTE: CUSTOMIZE THIS COMMAND)
node server.js &

# download and install ngrok
curl -s https://bin.equinox.io/c/4VmDzA7iaHb/ngrok-stable-linux-amd64.zip > ngrok.zip
unzip ngrok.zip
./ngrok http 5000 > /dev/null &
# sleep to allow ngrok to initialize
sleep 2

# Download JSON parser for determining ngrok tunnel
wget https://stedolan.github.io/jq/download/linux64/jq
chmod +x jq

# extract the ngrok url
NGROK_URL=$(curl -s localhost:4040/api/tunnels/command_line | jq --raw-output .public_url)

curl -u $ASSERTIBLE_API_TOKEN: -s $TRIGGER_URL -d'{
  "environment": "'"$CI_BRANCH-$CI_COMMIT_ID"'",
  "url": "'"$NGROK_URL"'",
  "wait": true
}'
Note: Modify the first line to the command that starts your application
This script will run your application, start an ngrok tunnel, and
then tell Assertible to run your tests against the ngrok URL. This
is a great time to run your automated API tests before your
application is deployed.
Running checks after a deployment
Codeship's deployment pipelines make is easy to run tests and checks against your web app after it has been deployed. Add a custom-script step to your Codeship pipeline that calls this command:
# POST a deployment release to Assertible, and your tests will run against it
curl -u $ASSERTIBLE_API_TOKEN: -XPOST https://assertible.com/deployments -d'{\
    "service": "'"${ASSERTIBLE_SERVICE_ID}"'",\
    "environment": "staging",\
    "version": "'"${CI_COMMIT_ID}"'"\
}'
Note: Learn more about setting the environment parameter in
the
Deployments API documentation.
And that's it! For a more in-depth tutorial on running API tests with Assertible and Codeship, check out this blog on Adding post-deploy smoke tests to any Codeship pipeline
Now, after your application is deployed from Codeship, tests will be run against the new release. Now you can set up test failure alerts with Slack or email to get notified if your post-deploy tests fail.
The easiest way to test and
monitor your web services
Reduce bugs in web applications by using Assertible to create an automated QA pipeline that helps you catch failures & ship code faster.