Assertible supports several pre-defined authentication types and the ability to dynamically fetch data needed to authenticate requests or initialize session cookies, giving you and your team the flexibility needed to authenticate a wide array of API requests.

Securely handling user data is our top priority. If your tests require authentication, we highly recommend using dedicated test data, accounts and users, and login credentials when testing your web service.
Additionally, using encrypted variables for all tokens, usernames, and passwords provides an additional layer of security to protect your data.
Supported Auth Types
Assertible has built-in forms for the most common types of HTTP authentication:
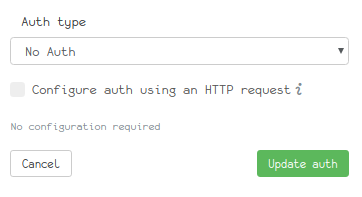
No Auth
No auth is the ommission of any authentication parameters in HTTP requests and is commonly used on a single test or setup step to override the default auth.
Basic Auth
Basic Auth in Assertible allows you to configure HTTP Basic
authentication using
a simple key:secret pair.
To configure Basic Auth, simply provide a key and secret pair in the auth
form. Assertible will use these values to add a base 64 encoded Authorization
header to HTTP requests.

Digest Auth
Digest Auth is
another type of HTTP Authentication mechanism, similar to Basic
Auth, that utilizes additional information, such as a nonce to
sign requests. Digest Auth provides slightly more security than Basic Auth
because it avoids sending a username and password to the server in plain text
and uses a cryptographic function over parts of the HTTP request before sending
it to the server.
To configure Digest Auth, simply provide your key and secret in the auth
form. Assertible will handle all other values provided by your server to sign
all requests in a test run.

API Token Auth
API Token Auth is a flexible authentication type that allows you to add a header or query parameter, containing a token, to HTTP requests in any location you choose. For example, a bearer token header or query parameter.
To configure API token auth, you need to supply the following values:
- Access token - The token value. To dynamically fetch your token, use an auth HTTP step
- Token location - The header or query parameter
- Header or query parameter name The name of the header or query
parameter. For example, a query parameter of the form
?api_token=<token>would useapi_tokenas the value. - Token prefix - For example, a bearer header of the form
Authorization:
Bearer <token>
would use the stringBeareras the prefix.
The following image provides an example of creating a Bearer Token auth header:

If you need to dynamically fetch a token or make an HTTP request before definining your API token, use an auth HTTP step.
OAuth 1.0a
OAuth 1.0a is an authentication type allowing Assertible's test runners to make authenticated requests to your application.
In general, Assertible's OAuth 1.0 implementation is based on application-only authentication, otherwise known as a Client Credentials Grant and requires you to register a client in your OAuth application prior to configuring auth in Assertible.
By registering an OAuth client with your application, you will be provided the necessary authentication parameters to configure Assertible to make signed requests on your behalf.
After you have registered a new client with your application, you should be able to fill out Assertible's authentication form:
- Consumer key
- Consumer secret
- Access token
- Access token secret
- Token location (header or query parameter)
- Header or query parameter name
- Token prefix - The token prefix adds a text string before the primary computed access token.

OAuth 2
OAuth 2 is an authentication type which allows Assertible tests to make authenticated requests to your API without exposing your password.
There are two steps to configuring OAuth 2:
Create an access token which can be used by Assertible to make requests to your application. If you already have an access token, skip to step 2.
If you do not have any way to create access tokens, but have a:
- client id
- client secret
- authorization url
- token url
- list of scopes (optional)
You can visit Assertible's OAuth2 Token Generator to create one. Often times this access token can be created from your applications user-interface outside of the Assertible dashboard.
For an example demonstrating this step, refer to Obtaining an OAuth 2.0 bearer token.
Configure auth in Assertible
- Access token
- Token location
- Header or query parameter name
- Token prefix (optional)

Auth HTTP Step
Assertible also supports making an HTTP request to populate the auth definition. This is useful for cases where you need to fetch a token or make a login request. The auth HTTP step is run once to populate the auth for all tests in a test run, so it is capable of handling tokens that need to be frequently refreshed, and similar scenarios.
To use the auth HTTP step, check the Make HTTP request to populate auth checkbox in the auth form. From there, you can configure the request and capture variables. The variables captured in the HTTP step settings can be used in the auth definition.
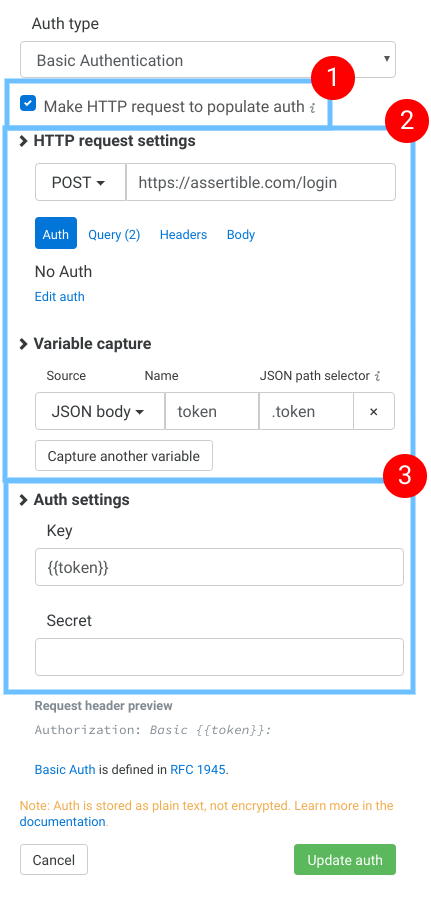
In the image above, the auth HTTP step is configured like this:
This checkbox enables the HTTP step option
This section configures the request that will be made before the auth is populated.
Note: this example captures a variable called
{{token}}.Fill in the final auth settings. Here you can use variables captured from section 2.
Learn more about configuring the request and capturing variables here.
Session auth and cookies
Tests in Assertible enable cookies by default. If you wish to use a session cookie based log-in to authenticate tests, e.g. to test a website, the best course of action is to:
- Configure your web service default auth or environment auth to use No Auth
- Enable the Auth HTTP Step
- Configure the Auth HTTP Step to initiate a site-login
When the log-in is successful, the session cookie will be enabled for all tests
in the corresponding test run. All Set-Cookie headers in previous requests
will be respected and passed through each test.
Auth examples
The following section contains examples demonstrating common authentication workflows.
GitHub OAuth 2.0 auth example
This example describes in detail how to obtain and use an OAuth 2 token to authenticate requests to the GitHub API.
Obtaining an OAuth 2.0 Bearer Token
The first step to authenticating requests to the GitHub API is to obtain an OAuth 2 bearer token. There are two options:
Option 1: Obtaining a personal access token
- Go to https://github.com/settings/tokens/new. Enter a name for the token under "Note", tick "repo" under "Scopes" and click the "Generate token" button at the bottom of the page.
Option 2: Registering an OAuth App
Go to https://github.com/settings/applications/new?oauth_application[name]=oauth2-example&oauth_application[url]=http%3A%2F%2Fexample.com%2F&oauth_application[callback_url]=https%3A%2F%2Foauth2.assertible.com%2Fauth%2Fcallback to register a new OAuth application.
Click on the "Register application" button. You should now see a "Client ID" and a "Client Secret"
Open https://oauth2.assertible.com/ and fill in the
client_idandclient_secret, using the values that you obtained in the previous step. Usehttps://github.com/login/oauth/authorizeforauthorize_urlandhttps://github.com/login/oauth/access_tokenfortoken_url. Leavescopeempty.Click on the "Submit Query" button. You should now see a token that you can use with Assertible.
Using an OAuth 2.0 Bearer Token with Assertible
Go to https://assertible.com/ and sign in to your account.
Click on the "New web service" button on the upper right corner of the "Services" page (if you don't have any services yet, you can skip this step).
Enter
https://api.github.com/user/reposinto the service input field and click the "Import URL" button.Confirm the import by click on the "Create service and tests" button.
Now you should see an "Overview" of the newly created service with one single test. The test is failing with a
403status code. Click on the orange "Tests are failing with 403 status codes. You may need to add auth to your environment." alert message on the right.Under "Authentication" click on "Edit default auth".
Select "OAuth 2.0 Bearer Token" from the dropdown menu for "Auth type".
Paste the token that you obtained in the previous section into the "Access token" field.
Set "Header name" to "Authorization", "Token prefix (optional)" to "Bearer" and click the "Update auth" button.
Click on "Environments" on the left side and then click the "pen" icon for the
productionenvironment.Click on "Add environment header", set "Header name" to "User-Agent" and "Value" to "assertible" and click the "Save Environment" button.
Click the ">" button at the upper right to run all tests. The test run should now pass.
The easiest way to test and
monitor your web services
Reduce bugs in web applications by using Assertible to create an automated QA pipeline that helps you catch failures & ship code faster.