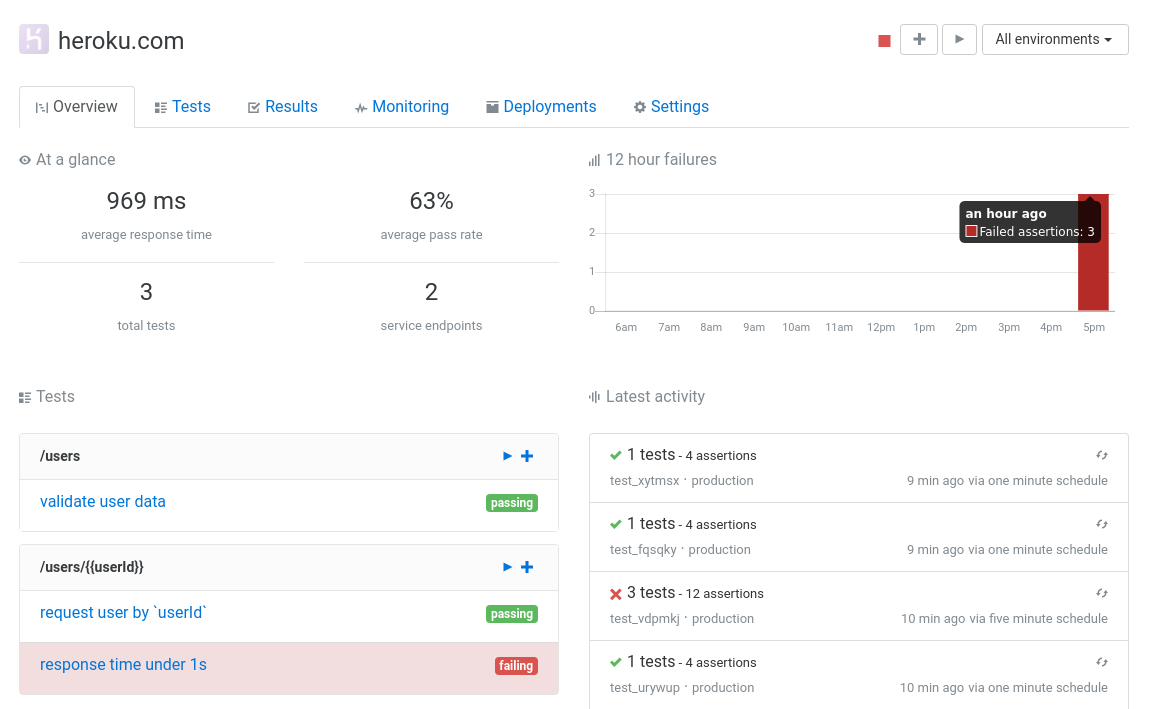
Web services are the core building block used to model real-world APIs and websites. Using web services, you can: create and organize tests, configure default authentication and settings, setup monitoring, and track deployments across multiple environments like staging, QA, and production.
Sections
- Importing a web service (Swagger, Postman, or curl)
- Configuring a web service
- Environments
- Automation and alerts
- Test groups
- Status badges
- Transferring a web service
Importing a web service
There are four ways to create a new web service:
- Importing a URL
- Importing a Swagger/OpenAPI spec (v2 & v3)
- Importing a Postman Collection
- Importing a
curlcommand
Importing a URL
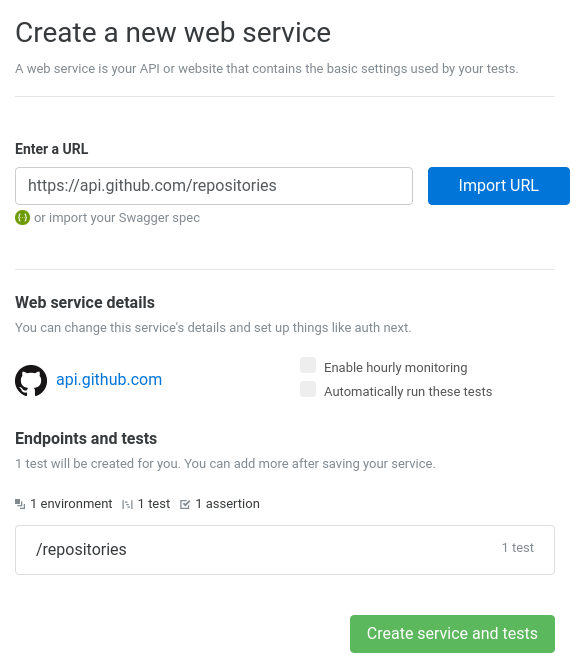
The simplest and most minimal way to create a web service is to import a URL. To create a new web service from a URL, navigate to the new service page, and input your URL into the Enter a URL field.
- To preview the import, click Import URL.
- To finalize the import, click Create service and tests.
Importing a Swagger/OpenAPI spec
Assertible supports v2 and v3 Swagger/OpenAPI specifications in either JSON and YAML format.
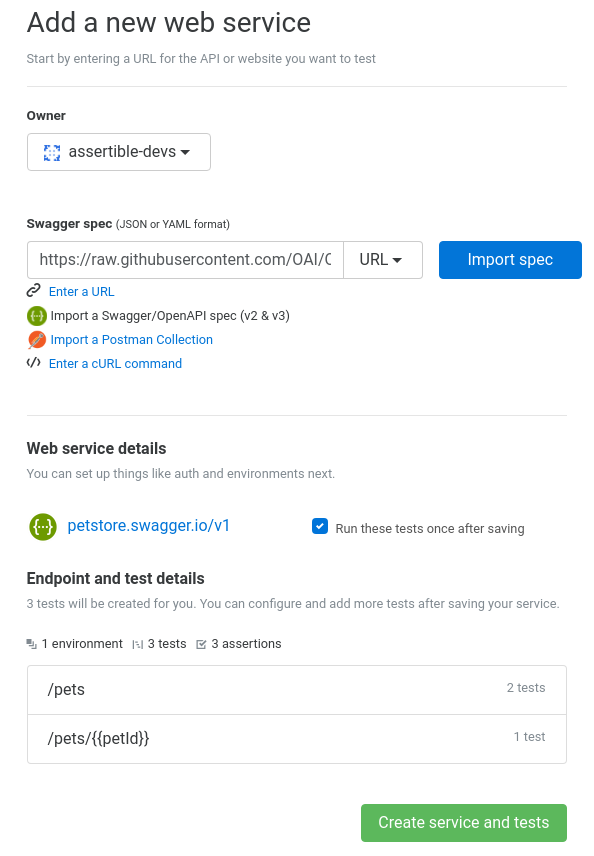
If you use Swagger or OpenAPI to define your API, you can import your spec to populate the entire web service configuration and automatically create a test for each endpoint/method combination. Incredible!
To import your web service and create API tests from a Swagger spec, visit the New Service page in your Assertible dashboard. From there, click Import a Swagger/OpenAPI spec (v2 & v3). The spec can be uploaded as a file or fetched from a URL in either JSON or YAML format.
When you import a Swagger definition, Assertible automatically identifies several critical pieces of information define your web service. Specifically:
- Create tests for every endpoint/method combination
- Detect path parameters and create variables
- Sets up default web service auth
- Automatically create JSON Schema assertions for operations that have a response definition
See this table for a detailed list of imported field mappings. If you want to re-import or sync tests when your specification changes, you're in luck! Check out our sync docs.
NOTE: If your API spec is in a format that is not OpenAPI/Swagger, try using APIMATIC's Transformer tool .
Importing a Postman Collection
If you use a Postman Collection for testing your web service, you can import the entire configuration and automatically create Assertible tests for each collection item.
To import your web service from a Postman Collection, visit the New Service page in the Assertible dashboard. From there, click or import a Postman Collection. You can import your Postman Collection via a URL or file in JSON format.
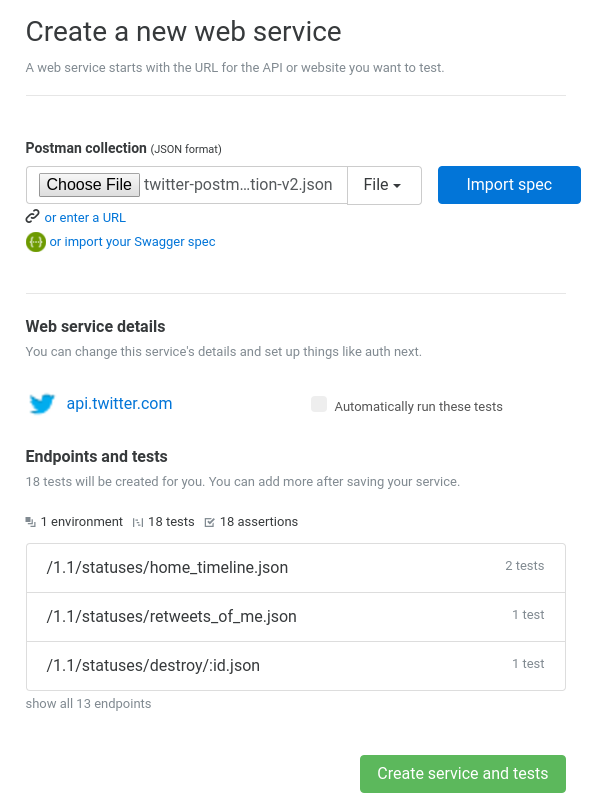
Heads up! Your Postman collection needs to be exported in v2 format. If your API definition is in a format that is not Postman Collection, try using APIMATIC's transformer.
How it works:
Assertible scans your collection for the primary API host
If your collections makes HTTP requests to a single URL, Assertible will use that as the API host.
If your collections makes API calls to multiple APIs, the one with the most items will be used as the API host.
For best results, it's usually best to have a collection that is geared at defining and testing endpoints for a single API.
If you use a parameterized base URL (list
{{HOST}}orapi.{{my-host}}.com, Assertible will not be able to import it without a global variable defining the initial host to use.Assertible creates an API and a test for each item
If any part of the host URL is a variable, Assertible will not be able to import
extracted fields:
- HTTP method
- HTTP scheme/protocol
- Test name
- Descriptions
- Variables
- Headers
- Query parameters
- Request body
All authentications entries are extracted
If an
Authentry is only used on a single request, Assertible will only add that to the specific test extracted for that entry.
Unsupported features:
- environment variables
- pre-request http requests to populate variables
- unresolvable {{host}} or {{port}}
- file/binary uploads
- WebDAV HTTP methods -
COPY,LINK,UNLINK,PURGE,LOCK,UNLOCK,PROPFIND, andVIEWare unsupported
Limited support:
- OAuth 1.0a
- OAuth 2.0
- request body
For many of these we are planning to implement enhancements. Reach out to us if you have any feature requests, suggestions, or problems importing your collection
If you want to re-import or sync your tests when your Postman Collection changes, you're in luck! Check out our sync docs.
Importing a curl command
A web service and test can also be created by simply pasting in a
curl command. If you have a command that's runnable from the
command-line, you can enter it in
the new service form and a web service and
test will be set up automatically.
- To preview the import, enter a
curlcommand and click Import cURL. - To finalize the import, click Create service and tests.

Configuring a web service
A web service can be configured on the dashboard Settings tab.

There are several fields you can customize:
Name
The name of the web service. Usually this is something as simple as "Assertible API". If API settings are imported from a Swagger specification, the name (and most other settings) will be created automatically.
Host URL
The web service Host URL is the default base URL where your API
lives.Generally, the default API host is configured to be the
production URL of your web service.
Environments are used to model other deployments
URLs for the same web service such as staging, qa, or dev. When
you create a web service, a default environment is created named
production.
For example, in https://api.assertible.com/tests the Host URL would be
api.assertible.com. Or if you wanted to test a website, say
https://assertible.com/plan - then the Host URL would be
assertible.com.
Authentication
Web services use a tiered authentication mechanism that gives you fine-grained control over how your tests' HTTP requests are authenticated. The section below describes how authentication works at a high level. To learn more about specific authentication configuration types, see the authentication documentation.
There are three fundamental mechanisms used to configure auth:
Default Auth
A web service's default auth configuration describes how all test requests are authenticated by default.

-
Any non-default environment can define it's own authentication configuration or fallback to using the Default Auth configuration.

-
Test, setup, and teardown step's can override the default or environment auth.

To learn more about how to configure authentication for your web service's environments and tests, see the authentication documentation.
Schemes
Schemes are the HTTP protocols that your web service supports: either
http or https or both. When a scheme is configured, tests for
that web service will know which schemes are supported. You can set or
override the scheme used on any test in
the test configuration.
Rate limit
The Rate limit setting is used to configure the maximum number of requests per second that will hit your web service when tests are run. This is useful for APIs and web apps that have built-in request throttling, and allows you to configure Assertible to abide by those limits. The default rate limit is 15 requests/s.
Throttling is done for all requests in a run ID. A single run ID may contain multiple tests (eg, 10 tests running on a schedule), and a test may make multiple requests (eg, with setup steps or a link checker assertion). In all of these cases, requests will be throttled to your service's rate limit setting.
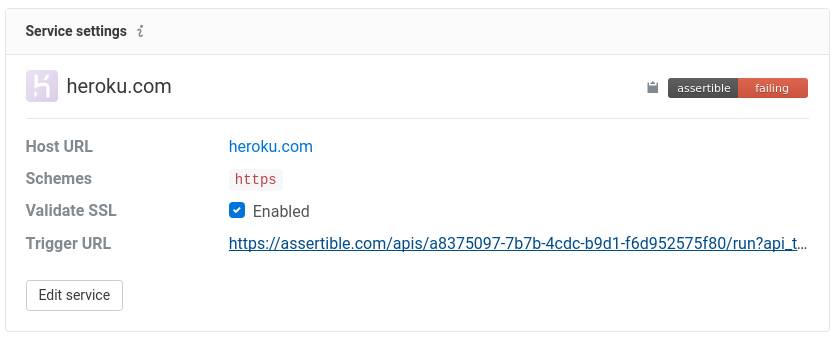
The rate limit setting can be found on your web service's Settings tab, with the other primary service settings.
Note: Rate limiting is not done across different run IDs. For example, if two schedules run at the same time, they will be throttled independently.
Automation and alerts
Automation is an importand aspect of testing web services. In Assertible, there are several different types of automation:
See more extensive docs on automation in our automation section.
Test groups
Groups allow you to label and categorize specific tests, making it easier to manage distinct sets of tests.

Create and edit groups
Groups can be added, edited, and deleted on the Tests page of your web service, by clicking the Groups tab. All you need for a new group is a name and a color.
Add and remove tests from a group
You can also add or remove tests from a group on the Tests page of your web service. Click the checkbox next to the test(s) you want to add or remove, then click the Group dropdown action menu to select the group.
Group trigger URLs
Each group has a unique trigger URL that can be used to run the tests in that group from outside of the dashboard. To get the trigger URL for a group, click the Group dropdown on the web service's Tests page, and click Copy Trigger URL.
Web Service Badges
Each web service has an embeddable badge for displaying the current status of all test assertions for the latest test runs. You can use this to communicate the current status of a web service with team members or within documentation pages.
Badges can be copied from a web services Settings tab under Service settings (there's even a link to directly copy markdown).
You can also create a badge for a
specific environment like
staging or production by using the environment query parameter
on the trigger url.
Examples:
Badge monitoring production
https://assertible.com/apis/{{api-id}}/status?api_token={{token}}Badge monitoring staging
https://assertible.com/apis/{{api-id}}/status?api_token={{token}}&environment=stagingMarkdown:
[]HTML:
<img src="https://assertible.com/apis/{{api-id}}/status?api_token={{token}}" alt="Assertions Status" />Environments
Environments allow you to test your web service in different URLs,
like staging, localhost, and production. This allows you to test
and monitor your web service in differen scenarios and with more
control.
To test a service in staging, for example, you could create an
environment named staging with a URL of
staging.assertible.com. Some settings will be inherited from the
main web service settings unless they are overridden.
Sections
- Environment auth
- Environment headers
- Environment variables
- Environment SSL validation
- Environments and integrations
Environments make it easy to run your API tests against different instances of your web service. When running tests from the dashboard, you can use the environment drop-down selector to set the current environment.

When you change the environment from the dashboard using the drop-down selector, different views will be updated to only reflect the test result status for that specific environment There is a special selector named All environments which will not apply any filters to test results. When using All environments, any test run buttons will be run against the default environment.
Environment auth
In Assertible, a web service has a default auth that is used on every test. Environments can also specify their own default auth. When tests are run, the auth from the current environment will be used.
To configure default auth for an environment, visit the Environments section of the Settings tab for your web service:

An environment can also choose to use default API auth, which means tests run against that environment will use the default auth defined at the service level.
Learn more about configuring auth for your web service tests.
Environment headers
In addition to auth, you can define default request headers on the
environment. These headers will be used for all tests run on that
environment. For example, in cases where you are required to set a
User-Agent header on all API requests, or similar, environment
headers can be used.
Environment variables
In Assertible, each environment can define a set of default variables which can be used by any test. Environment variables are useful for a number of use-cases including:
- Representing seed data fixtures in pre-production and production environments.
- Avoiding superfluous setup and teardown steps, making tests more robust and less flaky.
- Reducing duplication of variables between tests
- Reducing test maintenance by sharing common data
To configure variables for an environment, visit the Environments section of the Settings tab for your web service:

Variable precedence
Similar to environment auth, variables have an established precedence to make it possible to override a variable on a specific test. The precedence is as follows:
- Test-level variables (highest precedence)
- Dynamic variables using setup steps
- Environment variables (lowest precedence)
For example, if you have a variable named {{user1-uuid}} in your
environment, then create a
new setup step which also defines a
{{user1-uuid}} variable, the setup step definition will be used and
not the environment variable.
Furthermore, if you create a test variable with the same name, it will override both the setup step and environment variables.
Validate SSL
When the "Validate SSL" setting is enabled for a web service
environment, validations are run on the SSL certificate for the
request. For example, in the case of an SSL hostname mismatch or
certificate expiration, the AssertValidSsl core assertion would
fail.
Environments and integrations
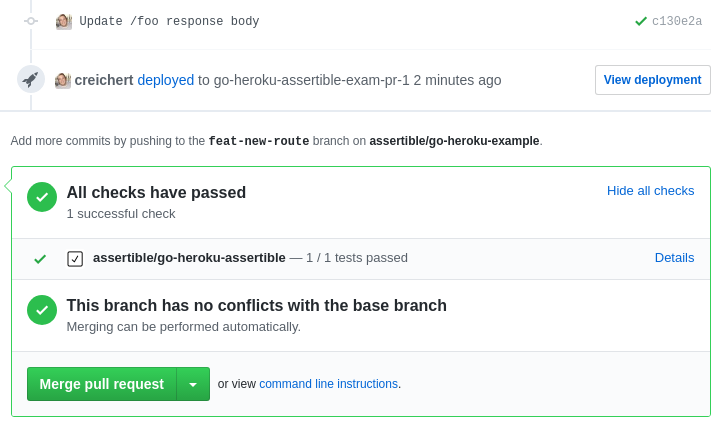
Environments are used by Trigger URLs and the Deployments API to specify the unique host URL to use when your tests are executed.
The image below shows an example using
the Deployments API
with GitHub status checks
enabled for a web service which was deployed to an environment named
assertible-staging using the GitHub API.
Transfer a web service
Note! When transferring a service, any integrations need to be re-installed on the new organization.
A web service can be transferred from a personal account to an organization. This is useful in cases where you've created a personal web service and are now ready to share and collaborate those tests with your team.
To transfer a web service, visit the Manage tab of your web service Settings. If the service is eligible to be transferred, you will see a form to select the new owner of the service. To transfer a service to an organization, you must have admin privileges.
Need help transferring your service to an organization? Reach out and we'll help you get set up!
The easiest way to test and
monitor your web services
Reduce bugs in web applications by using Assertible to create an automated QA pipeline that helps you catch failures & ship code faster.